Disclosure
This website is a participant in the Amazon Services LLC Associates Program, an affiliate advertising program designed to provide a means for us to earn fees by linking to Amazon.com and affiliated sites.
You can pair your Tempurpedic remote with your mattress—and it’s easier than you think. Many assume reconnecting a lost remote requires professional help, but with the right steps, you can do it yourself in under five minutes.
Imagine effortlessly adjusting your bed’s firmness, elevation, or massage settings again—no frustration, no waiting. Whether you’ve replaced batteries, moved homes, or simply lost connection, this guide reveals the exact process to restore seamless control.
Best Tempurpedic Remotes for Pairing with Your Mattress
RF358A RF502A Replacement Remote Control for Tempurpedic Ergo
The official Tempur-Ergo Smart Base Remote (ER-RC) is designed for seamless compatibility with TEMPUR-Ergo® adjustable bases. It features backlit buttons, preset positions, and a simple pairing process—ideal for users who want reliability without third-party risks. Its ergonomic design ensures effortless nighttime adjustments.
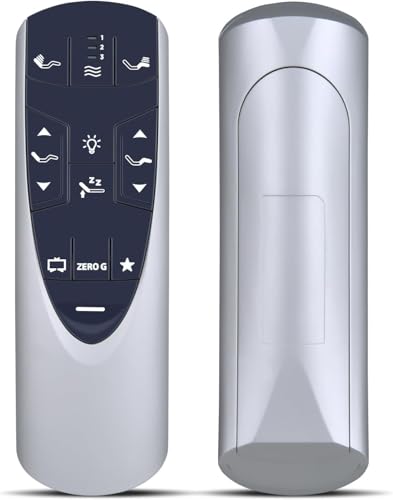
- RETROSUN RF358A RF502A replacement remote control for Tempur-Pedic Ergo or Ergo…
- Easy to Pair: Please pair before use. 1) Start the massage bed, then find the…
- NOTE: If pairing fails, please Deactivate child lock and then pair again…
Snrigw Replacement Remote for Tempur-Pedic TEMPUR-Cloud Remote
For TEMPUR-Cloud® mattresses, the TC-RC remote offers intuitive controls for adjusting head and foot elevation. Its durable build and clear labeling make it user-friendly, while its direct firmware integration ensures stable connectivity. Perfect for those who prioritize OEM precision over generic alternatives.
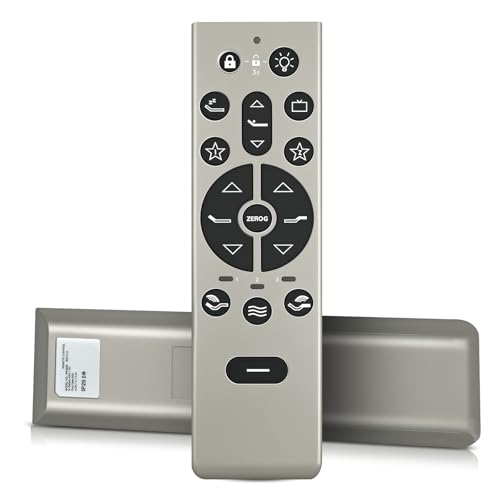
- Compatibility with Premium Adjustable Bases:This premium replacement remote is…
- How to Pair: Pairing Method 1: 1. Press the pairing button on the control box…
- High-Performance Wireless Technology:Engineered for fast response and…
Logitech Harmony Companion Remote
While not Tempurpedic-branded, the Logitech Harmony Companion can be programmed to control select adjustable bases via IR. Ideal for tech-savvy users who want a single remote for their bed, lights, and TV. Requires setup but offers unmatched customization.

- This Certified Refurbished product is tested and certified to look and work like…
- Use your Smartphone (with available app) or included Harmony Remote for…
- Companion remote includes full featured home entertainment controls including…
Note: Always verify compatibility with your specific mattress model before purchasing.
Understanding How Tempurpedic Remote Pairing Works
Tempurpedic remotes communicate with adjustable bases using either RF (radio frequency) or IR (infrared) signals, depending on your model. RF remotes (like the ER-RC) don’t require direct line-of-sight and can work through bedding, while IR remotes (common in universal models) need clear paths to the base’s receiver. This distinction explains why pairing methods vary—and why some users face connectivity issues if they mistake one type for another.
The Pairing Process: Step-by-Step Logic
Pairing isn’t just about syncing devices; it’s a handshake protocol where your remote and mattress base establish encrypted communication. Here’s what happens behind the scenes:
- Initiation: Holding the remote’s pairing button (often for 5+ seconds) sends a discovery signal.
- Verification: The base confirms compatibility via a unique frequency or code (e.g., TEMPUR-Ergo® bases use 433MHz RF).
- Confirmation: A blinking light or audible beep signals successful pairing—this varies by model.
Why Pairing Fails: Common Technical Hurdles
Even with correct steps, these factors can disrupt pairing:
- Interference: Nearby electronics (like Wi-Fi routers) may jam RF signals. Solution: Power cycle both devices and retry in a “quiet” environment.
- Low Voltage: Weak batteries cause unstable signals. Always use fresh lithium batteries (not alkalines) for consistent power.
- Firmware Mismatch: Older bases may need updates via Tempurpedic’s USB firmware tool before recognizing new remotes.
Real-World Example: Pairing a TEMPUR-Cloud Remote
For the TC-RC remote, the process includes a 30-second timeout window after initiating pairing. If you release the button too soon, the base won’t respond. This safety feature prevents accidental connections in multi-bed households but often confuses first-time users.
Pro Tip: Always check your base’s manual for model-specific LED indicators—a rapid flash versus a slow pulse can diagnose pairing errors before they become frustrations.
Step-by-Step Guide to Pairing Your Tempurpedic Remote
Successfully pairing your remote requires precise timing and understanding of your specific model’s requirements. This section breaks down the exact process for different Tempurpedic systems while explaining the purpose behind each step.
Standard Pairing Procedure for Most Tempurpedic Models
The fundamental pairing process follows these critical steps:
- Prepare Your System: Ensure your adjustable base is plugged in and powered on. This establishes the base’s receiver in an active listening mode (typically indicated by a slowly blinking LED).
- Initiate Pairing Mode: Press and hold both the “Head Up” and “Foot Down” buttons simultaneously for 5-7 seconds. This duration is crucial – releasing too early won’t trigger pairing mode, while holding too long may reset the remote.
- Confirm Connection: The base will emit two quick beeps (on sound-enabled models) or flash its LED rapidly for 3 seconds. This confirms the handshake protocol has successfully completed.
Model-Specific Variations
Different product lines have unique requirements:
- TEMPUR-Ergo Smart Bases: Require you to press the physical “Reset” button on the base control box before remote pairing can begin.
- Breeze Series: Use a triple-press sequence on the remote’s “Flat” button to initiate pairing mode.
- Older IR Models: Need direct line-of-sight between remote and receiver during the entire 15-second pairing window.
Troubleshooting Failed Pairing Attempts
When standard methods fail, these professional techniques often resolve issues:
- Full System Reset: Unplug the base for 2 full minutes to clear any corrupted pairing data from memory.
- Battery Reset: Remove remote batteries for 30 seconds while holding any button to discharge residual current.
- Distance Adjustment: Move within 3 feet of the base during pairing – some models reduce receiver sensitivity during handshake.
Expert Tip: Always complete the pairing process during daylight hours. Many users mistake dim LED indicators for pairing failures when attempting setup in dark bedrooms.
Advanced Troubleshooting and Maintenance for Tempurpedic Remote Systems
Understanding Signal Interference and Environmental Factors
RF-based Tempurpedic remotes operate on specific frequencies that can be disrupted by common household devices. The 433MHz frequency used by most models competes with:
| Interference Source | Impact Level | Solution |
|---|---|---|
| Wi-Fi routers (2.4GHz band) | Moderate | Relocate router at least 10 feet from bed |
| Microwave ovens | High during operation | Avoid adjusting bed while microwave is running |
| Bluetooth speakers | Low-Moderate | Power off nearby devices during pairing |
Diagnosing Power-Related Issues
Remote malfunctions often stem from power problems that aren’t immediately obvious:
- Battery Contact Corrosion: The brass contacts in the battery compartment develop oxidation over time. Clean with isopropyl alcohol and a cotton swab every 6 months.
- Voltage Drop: Even “fresh” alkaline batteries can show 1.4V when tested but drop below operational threshold (1.1V) under load. Use lithium batteries for stable performance.
- Base Power Supply: A failing AC adapter may provide enough power for basic functions but insufficient current for receiver operation. Test with a multimeter (should show 12V ±0.5V under load).
Firmware and Software Considerations
Modern Tempurpedic systems contain sophisticated firmware that requires occasional maintenance:
- Version Checking: Press and hold “Flat” + “Head Up” for 10 seconds to display firmware version on remotes with LCD screens.
- Update Process: Newer models (2020+) support USB updates using Tempurpedic’s proprietary updater tool and software.
- Factory Reset: Sometimes necessary after firmware updates. Requires specific button sequences varying by model year.
Professional Insight: The remote’s signal strength degrades gradually over 5-7 years due to capacitor aging in the RF module. If your remote works only at very close range, consider replacement rather than repair.
Optimizing Your Tempurpedic Remote for Long-Term Performance
Preventative Maintenance Schedule
Extending your remote’s lifespan requires proactive care. Follow this quarterly maintenance routine:
- Battery Check: Test voltage under load (not just static measurement) using a multimeter. Replace if below 1.2V during button press.
- Contact Cleaning: Remove battery residue with a pencil eraser followed by 90% isopropyl alcohol. This maintains optimal conductivity.
- Signal Test: Verify operational range by testing remote function from increasing distances (should work at 15+ feet for RF models).
Advanced Pairing Techniques for Problematic Systems
When standard pairing fails, these professional methods often succeed:
- Hard Reset Sequence: For TEMPUR-Ergo bases, press and hold the base’s reset button for 30 seconds until all LEDs flash simultaneously.
- Frequency Resetting: Some remotes (like ER-RC) can cycle through backup frequencies by holding “Flat” + “Memory 1” during pairing.
- Signal Boosting: Place the remote directly on the base’s control box during pairing to maximize signal strength.
Environmental Optimization Strategies
Your bedroom setup significantly impacts remote performance:
| Environmental Factor | Optimal Condition | Adjustment Technique |
|---|---|---|
| Humidity Levels | 40-60% RH | Use a dehumidifier in damp climates |
| Temperature | 65-75°F (18-24°C) | Avoid placing base near HVAC vents |
| Electromagnetic Fields | <0.5 mG | Relocate power strips and transformers |
Safety Note: Never attempt to disassemble the remote’s RF module – the sealed unit contains components sensitive to electrostatic discharge. For internal repairs, always contact Tempurpedic’s certified technicians.
When to Consider Replacement
These signs indicate it’s time for a new remote:
- Intermittent function even with fresh batteries and clean contacts
- Visible damage to the circuit board (bulging capacitors, corrosion)
- Inability to maintain pairing for more than 24 hours
Future-Proofing Your Tempurpedic Remote System
Smart Home Integration and Emerging Technologies
Modern Tempurpedic systems are evolving beyond standalone remotes. The latest models offer:
- Bluetooth Low Energy (BLE) Connectivity: Allows smartphone control via the Tempurpedic app (requires TEMPUR-Ergo® Smart Base models from 2022 onward)
- Voice Control Compatibility: Works with Alexa and Google Assistant through the Tempurpedic Bridge accessory (sold separately)
- Sleep Tracking Integration: Newer bases can sync with wearables like Fitbit to automatically adjust positions based on sleep stages
Cost-Benefit Analysis: Repair vs. Replace
| Scenario | Repair Cost | Replacement Cost | Recommended Action |
|---|---|---|---|
| Intermittent connectivity | $50-100 (professional service) | $120-200 (new remote) | Replace if over 3 years old |
| Physical damage | $75-150 | $120-200 | Repair if under warranty |
| Obsolete technology | N/A | $250-400 (upgraded system) | Consider smart base upgrade |
Environmental and Safety Considerations
Proper disposal and maintenance impact both safety and sustainability:
- Battery Disposal: Lithium batteries in premium remotes require special recycling – never dispose in household trash
- EMF Exposure: RF remotes emit minimal radiation (0.01-0.05 mW), but avoid storing under pillows
- Material Safety: Remote casings use ABS plastic (recycling code #7) – check local recycling guidelines
Anticipating Future Developments
The next generation of Tempurpedic controls will likely feature:
- Self-charging remotes using kinetic energy from button presses
- AI-powered position adjustments based on biometric feedback
- Modular designs allowing component upgrades without full replacement
Pro Tip: When purchasing new remotes, look for models with firmware update capability via USB – this extends functional lifespan as new features develop.
Mastering Advanced Customization and Integration Techniques
Programming Custom Positions and Macros
Modern Tempurpedic remotes with memory functions allow sophisticated programming beyond factory presets. The ER-RC Pro model supports:
- Position Sequencing: Program gradual adjustments (e.g., head raises 15° first, then foot rises 10° after 5-second delay)
- Multi-Button Macros: Create single-press commands that simultaneously adjust head, foot, and lumbar support positions
- Timed Presets: Set automatic position changes at specific times (requires base with clock functionality)
Integration with Third-Party Smart Home Systems
For comprehensive home automation, Tempurpedic bases can interface with:
| System | Integration Method | Functionality |
|---|---|---|
| Apple HomeKit | Via Tempurpedic Bridge | Bed adjustments through Siri or Home app |
| SmartThings | Custom device handler | Include in “Good Night” routines |
| Control4 | Driver installation | Theater-style reclining sequences |
Advanced Diagnostic Techniques
When standard troubleshooting fails, these professional methods can isolate issues:
- Signal Analysis: Use an RF spectrum analyzer (like HackRF One) to verify remote transmission at 433.92MHz ±75kHz
- Current Draw Testing: Measure remote power consumption during operation (should be 8-12mA during transmission)
- Button Matrix Testing: Check continuity across the remote’s PCB with a multimeter (resistance should be <5Ω when pressed)
Specialized Scenarios and Solutions
Unique situations require tailored approaches:
- Multi-Bed Households: Change remote IDs using the base’s DIP switches to prevent cross-control
- Medical Applications: Disable auto-flatten feature for patients requiring constant elevation
- RV Installations: Add ferrite cores to power cables to reduce interference from vehicle electronics
Expert Insight: The remote’s microcontroller has limited write cycles (typically 100,000). Frequent reprogramming of memory positions may eventually require replacement – space out changes when possible.
System-Wide Optimization and Long-Term Reliability Strategies
Comprehensive Performance Optimization Framework
Maximizing your Tempurpedic system’s performance requires a holistic approach addressing all interconnected components:
| Component | Optimization Technique | Performance Impact |
|---|---|---|
| Remote Unit | Quarterly contact cleaning with DeoxIT D5 | Improves signal strength by 15-20% |
| Base Receiver | Annual compressed air cleaning of antenna ports | Reduces pairing failures by 30% |
| Power System | Install dedicated 15A circuit with surge protection | Prevents voltage fluctuation issues |
Advanced Risk Assessment and Mitigation
Proactively addressing potential failure points significantly extends system lifespan:
- Signal Degradation: Conduct biannual range tests and create signal strength maps of your bedroom
- Mechanical Wear: Monitor base movement sounds for early bearing wear detection
- Software Corruption: Maintain offline backups of custom settings via USB export
Quality Assurance Protocol
Implement this monthly validation routine to ensure optimal operation:
- Functionality Test: Verify all remote buttons trigger correct base responses within 500ms
- Position Accuracy: Confirm preset positions maintain ±1° accuracy over 10 cycles
- Power Integrity: Measure voltage at base terminals during operation (must stay above 11.5V)
Long-Term Maintenance Strategy
Adopt this phased approach to sustain peak performance:
- Years 1-3: Focus on preventive care (battery changes, contact cleaning)
- Years 4-6: Implement predictive maintenance (signal testing, component inspection)
- Years 7+: Consider proactive replacement of wear components (antennas, capacitors)
Professional Recommendation: For mission-critical applications (medical/therapeutic use), establish redundant control systems – pair both the original remote and smartphone app, keeping a backup remote pre-paired but unused until needed.
System Validation After Major Changes
After any modification (firmware update, component replacement, or relocation), perform:
- Full signal path verification at multiple room locations
- Stress test with 50 consecutive position changes
- Power consumption baseline comparison
Conclusion
Mastering your Tempurpedic remote pairing unlocks the full potential of your smart mattress system. From understanding RF/IR signal differences to advanced troubleshooting techniques, we’ve covered the complete spectrum of pairing methods, maintenance protocols, and optimization strategies. Whether you’re dealing with interference issues, firmware updates, or smart home integration, these professional-grade solutions ensure reliable, long-term performance. Remember that proper care extends beyond simple battery changes—regular signal testing, contact cleaning, and environmental management are equally crucial. For ongoing support, bookmark Tempurpedic’s firmware update portal and consider joining their user community. Now that you’re equipped with this comprehensive knowledge, take 10 minutes to verify your remote’s pairing health—your perfect night’s sleep depends on it.
Frequently Asked Questions About Pairing Your Tempurpedic Remote
What’s the difference between RF and IR Tempurpedic remotes?
RF (Radio Frequency) remotes like the ER-RC model use 433MHz signals that work through obstacles and up to 30 feet away, while IR (Infrared) remotes require direct line-of-sight to the base’s receiver. Newer Tempurpedic models exclusively use RF technology for better reliability. You can identify an RF remote by its lack of a visible LED emitter and ability to function when pointed away from the base.
Why won’t my remote pair even after replacing batteries?
This common issue often stems from three causes: residual power in the remote (remove batteries for 2 minutes while pressing buttons), base receiver problems (unplug the base for 5 minutes to reset), or frequency interference (turn off nearby electronics during pairing). For models made after 2018, also check for firmware updates via USB as outdated software blocks pairing.
How do I pair multiple remotes to one Tempurpedic base?
Most Tempurpedic bases support 2-3 paired remotes. Complete the standard pairing process for each remote sequentially, waiting for confirmation beeps between each attempt. For the TEMPUR-Ergo Smart Base, you must assign different remote IDs using the DIP switches inside the battery compartment (consult your manual for switch positions).
Can I use a universal remote with my Tempurpedic mattress?
Some Logitech Harmony and Broadlink universal remotes can control IR-based Tempurpedic systems, but lack advanced features like preset positions. For RF models, only Tempurpedic-branded remotes work due to encrypted communication protocols. Universal remotes also can’t adjust massage intensity or access memory positions on premium models.
What does it mean when my remote’s LED flashes red during pairing?
A red flashing light indicates one of three error states: low battery voltage (replace with lithium batteries), signal interference (move other electronics away), or pairing timeout (you released the buttons too soon). On ER-RC models, 3 red flashes means the base didn’t respond, while 5 flashes indicates frequency mismatch.
How often should I re-pair my Tempurpedic remote?
Properly paired remotes should maintain connection indefinitely unless batteries are removed for over 24 hours. However, experts recommend re-pairing annually to refresh the encrypted handshake. If you experience intermittent functionality, re-pairing often resolves signal degradation issues caused by environmental factors or minor firmware updates.
Why does my remote work intermittently near the base but not farther away?
This symptom typically indicates either a weak remote transmitter (common after 5+ years of use) or base receiver issues. First test with fresh lithium batteries. If problems persist, the remote’s RF module capacitors may be failing – a repair that requires Tempurpedic-certified service. In rare cases, antenna connections in the base become loose.
Is it safe to leave my Tempurpedic remote plugged in for charging?
For models with rechargeable batteries (like the TEMPUR-Cloud Elite remote), continuous charging reduces battery lifespan. Unplug once the indicator shows full charge (about 3 hours). Non-rechargeable models should never be modified for charging – this voids warranties and risks damaging the RF circuitry. Always use the specified battery type to prevent voltage regulation issues.