Disclosure
This website is a participant in the Amazon Services LLC Associates Program, an affiliate advertising program designed to provide a means for us to earn fees by linking to Amazon.com and affiliated sites.
Discovering your gel nail topper peeling can be frustrating, ruining a perfect manicure. The common causes is the first step to a long-lasting fix.
Peeling often stems from improper nail prep or applying layers too thickly. Addressing these specific application errors is key to preventing future issues.
Is Your Peeling Mattress Topper Ruining Your Sleep and Your Budget?
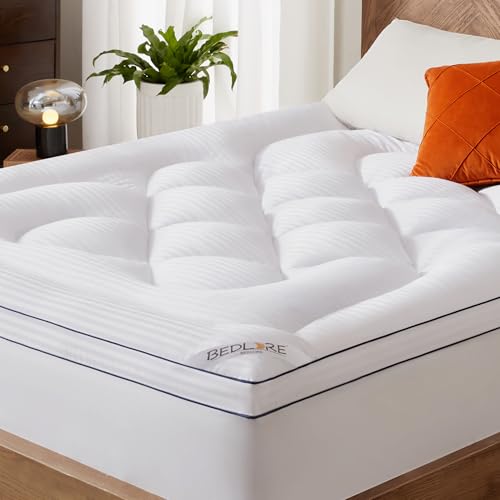
That unsightly peeling and flaking isn’t just annoying; it creates a mess and destroys comfort, forcing you to consider a costly new mattress. The OLANLY topper solves this with a durable, quilted cover that locks its premium foam in place, stopping peeling at the source and restoring deep, supportive sleep on your existing bed.
For a permanent fix to peeling and renewed comfort, we recommend: OLANLY Dual-Layer 4 Inch Memory Foam Mattress Topper

- Dual-Layer Luxury for Supreme Comfort: Designed with a 2-inch gel-infused memory...
- Enhanced Pressure Relief & Body Alignment: Wake up refreshed and ache-free with...
- Snug Fit with Deep Pocket Skirt: The 360° elastic deep-pocket skirt hugs your...
Common Causes of Gel Topper Peeling and Lifting
Why your gel top coat peels is crucial for a lasting manicure. The root causes typically involve application technique or product issues. Identifying your specific problem is the first step toward a solution.
Improper Nail Preparation Before Application
This is the most frequent culprit for peeling gel polish. A contaminated nail plate prevents proper adhesion of the entire gel system. Skipping steps here guarantees premature failure.
- Oils and Moisture: Natural oils and lotions create a barrier. Always cleanse the nail with a high-quality, lint-free wipe and pure acetone or a dedicated nail prep solution.
- Insufficient Buffing: A perfectly smooth nail surface doesn’t allow the gel to grip. Gently buff the nail to create a matte, slightly rough surface for maximum adhesion.
- Cuticle Overgrowth: Applying gel to the cuticle or proximal nail fold causes immediate lifting. Push back cuticles thoroughly and ensure no product touches the skin.
Application Errors During the Manicure Process
Even with perfect prep, mistakes during painting can cause your top coat to peel. Technique matters just as much as the products you use.
- Flooding the Cuticles: If gel pools against the skin, it will lift as it cures. Leave a tiny, hairline gap between the gel and your cuticle on all sides.
- Applying Layers Too Thickly: Thick coats do not cure properly underneath. Always apply thin, even layers of both color and top coat for a complete cure.
- Incomplete Curing: Undercured gel remains soft and weak. Ensure your LED/LUV lamp is the correct wattage for your products and that you cure for the full recommended time.
How to Fix a Peeling Gel Top Coat Quickly
When your top coat starts to peel, you need a fast and effective repair method. A proper fix prevents further lifting and extends your manicure’s life. Follow these steps for a seamless, durable repair.
Immediate Repair for Minor Peeling and Lifting
For a small lifted section, you can perform a spot repair without redoing the entire nail. This method is ideal for catching the problem early. You will need a fine-grit buffer, cleanser, and your top coat.
- Clean and Dry: Gently clean under the lifted area with a cleanser-soaked brush. Let it dry completely to remove any moisture.
- Buff and Blend: Lightly buff the peeled spot and the surrounding gel to feather the edges. Wipe away all dust with a cleanser.
- Reapply and Cure: Apply a new, thin layer of top coat over the entire nail surface. Cure it for the full recommended time under your lamp.
Complete Removal and Reapplication for Severe Damage
If the peeling is widespread or the color layer is compromised, a full redo is the best solution. This ensures a strong, uniform bond from the base up. Proper removal is key to protecting your natural nails.
- File the Top Layer: Gently file the shiny top coat off the affected nails to break the seal. This allows the remover to penetrate.
- Soak Off Properly: Soak a cotton pad in acetone, place it on the nail, and wrap securely with foil for 10-15 minutes. The gel should slide off easily.
- Start Fresh: After removal, prep your nail from scratch: buff, cleanse, and apply a new base coat, color, and top coat with precise, thin layers.
Preventative Measures to Stop Gel Topper from Peeling
Prevention is the most effective strategy for a flawless, long-lasting gel manicure. By adopting the right habits, you can eliminate peeling before it starts. These measures focus on both product selection and consistent technique.
Choosing the Right Products for Your Nail Type
Not all gel systems are created equal, and using incompatible products is a common mistake. Your nail type and lifestyle should guide your choices. Investing in quality, compatible products from the same brand often yields the best results.
- Base Coat Matters: For oily nail beds, use a bonding or acidic primer base coat. For dry, brittle nails, a strengtheningrubber base coat provides better flexibility and adhesion.
- System Compatibility: Always use a top coat from the same brand and line as your base and color gels. Formulas are chemically designed to work together for optimal bonding and curing.
- Check Expiry Dates: Old or expired gel products can separate and lose their effectiveness. They may not cure properly, leading directly to peeling and chipping.
Perfecting Your At-Home Gel Application Technique
Mastering application is the final barrier against peeling. Small adjustments to your routine can make a dramatic difference in wear time. Consistency and patience are your greatest tools.
- Cap the Free Edge: After applying each layer—base, color, and top coat—run the brush along the very tip of your nail. This seals the free edge and prevents water from seeping underneath.
- Thin is In: Apply layers so thin they are almost sheer. It is better to cure three thin coats of color than one thick, goopy coat that will not cure in the center.
- Final Cure and Oil: After your final top coat cure, wipe the sticky inhibition layer with cleanser. Then, massage cuticle oil into the skin and nail to rehydrate and add flexibility.
| Common Problem | Preventative Action |
|---|---|
| Peeling at the cuticle | Leave a tiny gap; never flood the cuticle. |
| Whole nail lifting | Use a dehydrator & bonding primer on clean, buffed nails. |
| Top coat cracking or peeling | Ensure complete curing with a compatible, powerful lamp. |
Troubleshooting Specific Gel Top Coat Problems
Sometimes, peeling persists despite your best efforts. This section addresses specific, frustrating scenarios with targeted solutions. Identifying the exact symptom will lead you to the correct fix.
Why Does Only My Top Coat Peel Off?
When the color layer remains intact but the top coat separates, it indicates a specific adhesion failure. This is often related to the top coat layer itself or what lies directly beneath it. The solution involves surface preparation and application timing.
- Inhibition Layer Issues: If you did not wipe the sticky layer from your color gel before applying top coat, it creates a weak bond. Always lightly cleanse the color layer and let it dry completely.
- Top Coat Applied Too Thinly: An excessively thin top coat may not form a durable seal. Apply a full, even bead that self-levels across the entire nail surface.
- Contamination After Color Cure: Touching the nail with your fingers after curing the color transfers oils. Cleanse the nail plate again right before applying your top coat.
Fixing Wrinkling, Bubbling, and Incomplete Cures
These texture issues often precede peeling and stem from curing problems. They weaken the gel’s structure, making it prone to lifting and chipping. Your lamp and application speed are critical factors.
- Check Your Lamp: LED bulbs lose intensity over time. If gels are wrinkling or staying tacky, your lamp may be failing. Ensure it is the correct wattage and replace bulbs as recommended by the manufacturer.
- Apply and Cure Immediately: Do not pause after applying top coat. Exposing uncured gel to air or dust can cause imperfections. Place your hand in the lamp within 45-60 seconds.
- Shake Your Bottles: Gently roll your top coat bottle between your palms before use. This mixes the formula evenly and prevents the separation that leads to bubbling.
Essential Tools and Products for a Peel-Proof Finish
Having the right toolkit is half the battle in preventing gel top coat peeling. Quality tools ensure proper nail preparation and precise application. This list covers the must-have items for a professional, durable result at home.
Nail Prep and Application Essentials
These tools create the perfect foundation for gel adhesion. Skipping any can compromise your entire manicure. Invest in good-quality versions of each for consistent performance.
- High-Grit Buffer Block: A 180/240 grit buffer is ideal for gently removing shine and creating a textured surface without damaging the natural nail.
- Lint-Free Wipes & Pure Acetone: Use these for the final cleanse before base coat. Cotton balls or pads can leave behind fibers that disrupt adhesion.
- Quality Nail Dehydrator & Primer: A dehydrator removes moisture, while a primer (acidic or non-acidic) microscopically etches the nail for a superior bond. These are crucial for oily nail beds.
- Precision Brushes: A thin, angled brush for cuticle cleanup and a small detail brush for fixing errors allow for perfect application without flooding.
Choosing the Correct Curing Lamp
An underpowered or incompatible lamp is a leading cause of peeling gel polish. Your lamp must match the curing requirements of your gel products. Do not assume all lamps are the same.
| Lamp Type | Best For | Cure Time Consideration |
|---|---|---|
| UV Lamp | Older gel formulas, all systems | Longer cure times (often 2+ minutes) |
| LED Lamp | Modern “LED-curable” gels | Faster cures (30-60 seconds) |
| UV/LED Hybrid Lamp | Maximum compatibility | Follow specific product instructions |
Always cure for the full recommended time, even if the gel feels dry. The internal polymerization may not be complete, leading to a weak, peel-prone surface.
Advanced Tips for Long-Lasting Gel Manicures
For those who have mastered the basics, these advanced strategies can push your wear time to three weeks or more. They address environmental factors and subtle technique refinements. Implementing even one can make a significant difference.
Environmental and Lifestyle Adjustments
Your daily habits directly impact the longevity of your gel top coat. Certain activities and exposures are notorious for causing premature peeling. Proactive protection is your best defense.
- Wear Gloves for Chores: Constant exposure to hot water, soaps, and cleaning chemicals breaks down the gel’s seal. Wear waterproof gloves for washing dishes and cleaning.
- Moisturize Strategically: Hydrate your hands and cuticles daily with oil, but avoid getting heavy lotion on the nail plate before applying gel. After your manicure, oil helps maintain flexibility.
- Mind Temperature Extremes: Very hot water (like long baths) can cause the gel to expand and contract slightly, weakening adhesion over time. Rinse with warm, not scalding, water.
Professional Techniques for At-Home Use
Salon professionals use specific methods to ensure extreme durability. You can easily adopt these techniques with a little practice. They focus on enhancing the natural nail’s ability to hold the product.
- The “Double Seal” Method: After your final top coat cure, cleanse the nail. Then, apply a second, very thin layer of top coat, cap the free edge again, and cure. This adds an extra protective shield.
- Proper Nail Filing Shape: Sharp square or stiletto shapes are more prone to chipping and peeling at the corners. Opt for rounded square, oval, or almond shapes which have no weak points.
- Refill Instead of Remove: As your nails grow, gently buff the regrowth area and the existing gel’s surface. Apply new base, color, and top coat just to the new growth and blend over the old. This prevents over-filing the natural nail.
When to Seek Professional Help or Change Products
Sometimes, persistent peeling indicates a deeper issue that requires a different approach. Recognizing when to consult a professional or switch your product lineup can save time and protect your nail health. Not all problems can be solved with technique alone.
Signs You Should Visit a Nail Technician
A licensed nail tech can diagnose issues that are difficult to spot at home. Their expertise and professional-grade products often resolve chronic peeling problems. Consider booking an appointment if you encounter these scenarios.
- Consistent Peeling Across All Nails: If every single manicure fails within days despite perfect technique, a pro can assess your natural nail chemistry and recommend a tailored system.
- Allergic Reactions or Damage: Signs like itching, redness, or nail thinning require professional assessment. They can recommend hypoallergenic brands and safe removal methods.
- Inability to Diagnose the Cause: A technician can observe your application in real-time, identifying subtle errors in angle, pressure, or timing that you might miss.
How to Select a New Gel Polish System
If your current products consistently fail, it may be time for a change. Selecting a new system involves more than just picking a favorite color. Compatibility and reputation are paramount for success.
| Factor | What to Look For | Why It Matters |
|---|---|---|
| Brand Reputation | Established, professional brands used in salons. | Better formula consistency, reliable curing, and stronger adhesion. |
| System Completeness | A matching base, color, and top coat sold together. | Guarantees chemical compatibility for optimal bonding and finish. |
| Cure Specifications | Clear wattage and time guidelines for your lamp type. | Prevents undercuring, the leading cause of peeling and wrinkling. |
Start with a small starter kit from a reputable brand to test the system before investing in multiple colors. Read reviews specifically mentioning longevity and wear time.
Best Recommended Toppers for Lasting Comfort
Choosing a high-quality topper is essential for durability and performance. These recommended options are designed to resist common issues like peeling and provide superior support. Each is an ideal solution for different sleep needs and preferences.
Tempur-Pedic TEMPUR-Adapt + Cooling 3-Inch Twin XL Mattress Topper – Best for Pressure Relief
This premium topper uses proprietary TEMPUR material to contour to your body, alleviating pressure points. The 3-inch thickness and cooling technology provide deep comfort and temperature regulation, ensuring it maintains its integrity without peeling or degrading.

- COOLING 3-INCH TWIN XL TOPPER: TEMPUR-Adapt + Cooling topper is ideal for...
- SOFTEST TEMPUR MATERIAL: 3-inches of exclusive TEMPUR-ES Material precisely...
- WASHABLE COOLING COVER: Premium knit cooling cover provides cool-to-the-touch...
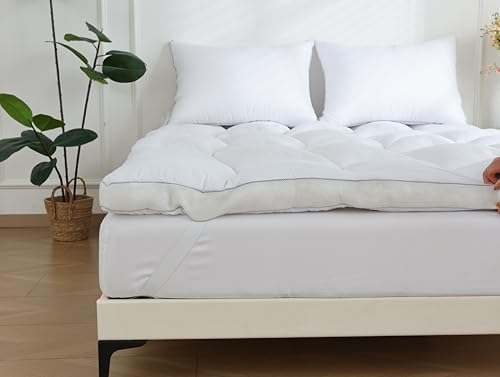
BEDLORE Queen Mattress Topper – Best Budget-Friendly Upgrade
An excellent value option that adds plush comfort to a firm mattress. It features a breathable bamboo cover and hypoallergenic memory foam designed to resist flattening. Its durable construction helps prevent the peeling and cracking common in lower-quality toppers.
- Improve Sleep Quality: Use polyester fabric and extra thick filler, improve...
- Ultra Soft Improves Comfort: Conforms to the curves and shapes of the body...
- Deep Pocket Design: Elastic deep pockets can accommodate mattresses 6-18 inches...
SHOUREN Memory Foam Mattress Topper – Best for Motion Isolation
Ideal for couples, this topper minimizes motion transfer for undisturbed sleep. The certified foam is ventilated for coolness and comes with a non-slip bottom. Its high-density design resists peeling and maintains its supportive shape over time.
- Memory Foam Mattress Topper Fullf, 3In Thick Plush Gel Foam Bed Topper , Smooth...
Conclusion
A peeling gel top coat is a common but fixable problem. By The root causes—from improper nail prep to application errors—you can achieve a flawless, long-lasting manicure.
The main point is that prevention through meticulous technique and quality products is always more effective than repair. With the steps outlined, you can enjoy a durable, peel-proof finish every time.
Frequently Asked Questions about Why Your Topper Is Peeling And How To Fix It Fast
Why does my gel top coat peel off in one piece?
This usually indicates a complete adhesion failure between the top coat and the color layer beneath it. The most common cause is not properly cleansing the sticky inhibition layer from the color gel before applying the top coat.
Oils or moisture contamination on the nail plate before the top coat application can also cause this. Ensure each layer is clean, dry, and lightly buffed if needed for the next step.
Can I fix a peeling top coat without redoing the whole nail?
Yes, for minor peeling, you can perform a spot repair. Gently buff the peeled area to feather the edges and clean it thoroughly with a nail prep solution. This creates a surface for new product to adhere to.
Apply a thin layer of top coat over the entire nail, ensuring it Easily blends over the repaired spot. Cure it fully under your lamp for a durable, invisible fix.
How long should a gel top coat last before peeling?
A properly applied gel top coat should last the full lifespan of your manicure, typically two to three weeks. Peeling within the first week almost always points to an error in application technique or nail preparation.
If peeling starts after 10-14 days, it is often due to natural nail growth and wear. At this point, a fill or fresh manicure is recommended rather than a simple repair.
Does the brand of top coat matter, or can I mix brands?
The brand matters significantly for chemical compatibility. It is best to use a top coat from the same brand and product line as your base and color gels. Formulas are engineered to bond and cure together optimally.
Mixing brands can lead to peeling, wrinkling, or incomplete curing because the chemical compositions may not interact correctly. For guaranteed results, stick with a complete system from one manufacturer.
What is the single most important step to prevent peeling?
The most critical step is thorough nail preparation. This includes gently buffing the nail plate to remove shine and meticulously cleansing it with a dehydrator or pure acetone to eliminate all oils and moisture.
Without a perfectly clean, dry, and slightly textured surface, no gel product can form a strong bond. Skipping or rushing prep is the primary reason top coats peel prematurely.
My lamp is new; why is my top coat still peeling?
A new lamp may have the wrong wavelength or wattage for your specific gel products. Check that your gel polish is compatible with LED or UV light and that your lamp meets the manufacturer’s specifications.
Also, ensure you are curing for the full recommended time. Even a powerful lamp cannot cure thick layers properly, so always apply thin, even coats of gel.