Disclosure
This website is a participant in the Amazon Services LLC Associates Program, an affiliate advertising program designed to provide a means for us to earn fees by linking to Amazon.com and affiliated sites.
A non-cooling topper can ruin your sleep and damage perishable goods. The common causes is the first step to a quick, effective fix.
Often, the issue isn’t a major breakdown but a simple airflow blockage or a dirty filter. A basic inspection can frequently restore cooling in minutes without a costly service call.
Is Your Hot, Uncomfortable Mattress Topper Ruining Your Sleep Night After Night?
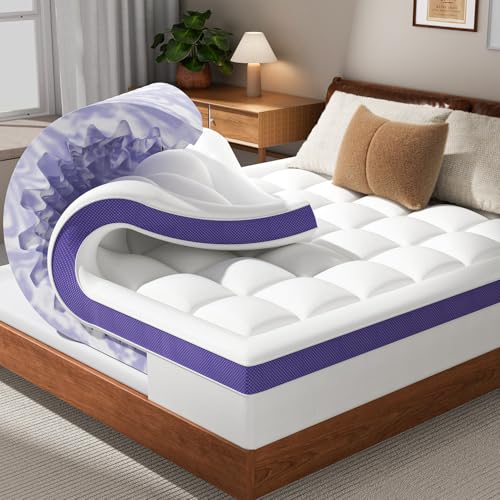
Many mattress toppers trap heat, causing you to toss, turn, and wake up sweaty. The OLANLY topper solves this with a dual-layer design. Its cooling gel-infused memory foam and breathable support foam work together to dissipate body heat, promoting airflow for a consistently cool and comfortable sleep surface all night long.
For a truly cool and restorative sleep, we suggest: OLANLY Dual-Layer 4 Inch Memory Foam Mattress Topper

- Dual-Layer Luxury for Supreme Comfort: Designed with a 2-inch gel-infused memory...
- Enhanced Pressure Relief & Body Alignment: Wake up refreshed and ache-free with...
- Snug Fit with Deep Pocket Skirt: The 360° elastic deep-pocket skirt hugs your...
Common Reasons Your Topper Is Not Cooling Properly
When your topper fails to cool, it’s usually due to a few key issues. Identifying the root cause quickly is essential for a fast repair. Let’s explore the most frequent culprits.
Airflow Blockages and Dirty Components
Restricted airflow is the number one reason for poor cooling performance. Dust and debris act as insulation, trapping heat inside the unit. This simple problem often mimics a major mechanical failure.
- Clogged Air Filter: A dirty filter drastically reduces airflow. Check and clean or replace it monthly for optimal performance.
- Blocked Vents or Coils: Furniture, curtains, or accumulated dust on the rear coils can choke the system. Ensure at least six inches of clearance on all sides.
- Frozen Evaporator Coil: This often stems from the two issues above. You may see ice buildup, which insulates the coil and stops cooling entirely.
Thermostat and Power Supply Problems
Sometimes the cooling system is fine, but the controls are not functioning correctly. Incorrect settings or electrical issues can prevent the compressor from kicking on.
First, verify the thermostat is set to a temperature colder than the room. Ensure it’s on “cool” mode and not “fan only.” A faulty thermostat may not signal the compressor to start.
Check the power supply thoroughly. Confirm the unit is plugged in securely and the circuit breaker hasn’t tripped. For hardwired models, a blown fuse in the disconnect box can be the issue.
Refrigerant Issues and Compressor Failure
These are more serious problems that typically require a professional. A refrigerant leak or a failed compressor will stop the cooling cycle completely.
Signs of low refrigerant include the unit running constantly but not cooling and ice on the large copper line (suction line). A failing compressor may hum but not start, or trip the circuit breaker repeatedly.
| Symptom | Likely Cause | Action Required |
|---|---|---|
| Ice on coils, warm air blowing | Airflow blockage or low refrigerant | Clean filter/coils; call technician |
| Unit runs but air is not cold | Dirty coils, fan problem, or refrigerant leak | Clean components; professional diagnosis |
| No sound from unit, no cooling | Power loss, failed thermostat, or dead compressor | Check power; professional repair needed |
Step-by-Step Guide to Fix a Topper That’s Not Cooling
Follow this systematic troubleshooting guide to restore your topper’s cooling power. Start with the simplest solutions before moving to complex checks. This process can save you time and money on unnecessary repairs.
Quick Fixes You Can Do in 10 Minutes
Begin with these immediate actions that address the most common issues. Many cooling problems are resolved at this stage without tools. Always ensure the unit is powered off before inspecting.
- Check Thermostat Settings: Verify the mode is set to “Cool” and the temperature is set several degrees below the current room temperature.
- Inspect and Clean the Air Filter: Remove the filter, rinse it with water, and let it dry completely. A clogged filter is a top cause of weak airflow.
- Clear All Vents and Coils: Remove any obstructions like furniture or drapes. Use a vacuum brush attachment to gently clean dust from the front vents and rear condenser coils.
Advanced Troubleshooting for Persistent Problems
If quick fixes don’t work, these steps require more attention. Safety first: always unplug the unit before performing any internal inspection. Listen for unusual sounds when you restart.
Check the outdoor condenser unit if you have a split system. Ensure it is free of leaves, grass, and debris. A dirty condenser cannot expel heat, crippling the entire cooling cycle.
Test the capacitor, a common point of failure. A faulty capacitor can prevent the compressor or fan motor from starting. This is a component a skilled DIYer can often replace with a multimeter and proper guidance.
When to Call a Professional Technician
Some repairs require certified expertise and specialized tools. Attempting these fixes yourself can be dangerous or may void your warranty. Recognize the signs that indicate you need professional help.
- Refrigerant Leak: If the system is low on refrigerant, there is a leak that must be found and repaired before recharging. Handling refrigerant requires a license.
- Compressor Failure: A compressor that hums but won’t start, or trips the breaker, has likely failed. This is a major repair best left to experts.
- Electrical Issues: If you suspect wiring problems, burning smells, or repeated breaker trips, stop use immediately and call a technician to prevent a fire hazard.
Preventative Maintenance to Keep Your Topper Cooling Efficiently
Regular maintenance is the best defense against future cooling failures. A simple routine prevents most common problems and extends your unit’s lifespan. Consistent care also maintains energy efficiency, lowering your bills.
Essential Monthly and Seasonal Maintenance Tasks
Incorporate these quick checks into your regular home upkeep schedule. They require minimal time but offer maximum protection for your cooling system. Prevention is always cheaper than repair.
- Monthly Filter Check: Inspect the air filter every month. Clean or replace it as needed, especially during peak summer usage. A clean filter ensures proper airflow and cooling capacity.
- Seasonal Coil Cleaning: At the start of the cooling season, gently vacuum the evaporator and condenser coils. For the outdoor unit, clear a two-foot radius of plants and debris.
- Inspect Drain Lines: Ensure the condensate drain line is clear. Pour a cup of diluted vinegar through it annually to prevent algae clogs that can cause water damage and humidity issues.
- Monthly: Check/clean air filter.
- Seasonally: Clean coils, clear area around unit.
- Annually: Flush drain line, consider professional tune-up.
Optimizing Topper Performance and Efficiency
Beyond basic cleaning, you can take steps to reduce strain on your system. These practices help the topper run less frequently and more effectively, preventing wear and tear.
Use ceiling fans to circulate cool air, allowing you to set the thermostat a few degrees higher. Ensure your home is well-insulated and that windows and doors are sealed to keep cool air in.
Avoid placing heat-producing appliances like lamps or TVs near the thermostat. The extra heat can trick the system into thinking the room is warmer, causing it to run longer than necessary.
Signs You Need a Professional Tune-Up
Even with diligent DIY care, an annual professional inspection is wise. A technician can spot small issues before they become big, expensive failures. They perform tasks beyond typical homeowner scope.
Schedule a tune-up if you notice a gradual decline in cooling power or a steady increase in energy bills. Strange noises, frequent cycling, or uneven cooling are also clear indicators.
During a tune-up, a pro will check refrigerant levels, test electrical components, calibrate the thermostat, and clean internal parts thoroughly. This investment can prevent up to 95% of breakdowns.
Diagnosing Specific Cooling Problems and Solutions
Sometimes the issue is very specific. This section helps you match symptoms to precise causes and practical fixes. Accurate diagnosis leads to faster, more effective repairs.
Topper is Running But Not Blowing Cold Air
This frustrating problem means the fan works but the cooling cycle does not engage. The unit moves air but cannot remove heat from it. The causes range from simple to serious.
- Dirty Condenser Coils: Outdoor coils caked with dirt cannot release heat. This causes high pressure, tripping the system off the cooling cycle. Clean them thoroughly.
- Faulty Capacitor: A weak capacitor can run the fan but not provide the extra jolt to start the compressor. Testing or replacing the capacitor often solves this.
- Low Refrigerant Charge: A leak reduces the refrigerant needed to absorb heat. You’ll need a technician to find the leak, repair it, and recharge the system.
Unit is Icing Up or Freezing Over
Ice buildup is a symptom, not a cause. It indicates an imbalance in the system where the evaporator coil gets too cold. Never chip at the ice; you must address the root issue.
The most common cause is restricted airflow from a dirty filter or blocked vents. This prevents warm air from flowing over the coil, letting it freeze. Turn the unit off to thaw, then clean the filter and clear obstructions.
Less commonly, a failing thermostat sensor or low refrigerant can cause freezing. If cleaning doesn’t resolve repeated icing, a professional diagnosis is required to check these components.
| Symptom | Immediate Action | Long-Term Fix |
|---|---|---|
| Warm air from vents | Check thermostat, clean filter, ensure outdoor unit is clear. | Professional coil cleaning; capacitor or refrigerant check. |
| Ice on indoor coil | Turn unit OFF to thaw completely (may take hours). | Replace air filter monthly; have technician check refrigerant level. |
| Short cycling (frequent on/off) | Clean filter and outdoor coil to reduce strain. | May require thermostat calibration or sizing assessment by a pro. |
Unusual Noises During Operation
Sounds are critical diagnostic clues. Identify the type of noise to pinpoint the failing component. Always investigate strange noises promptly to prevent further damage.
A grinding or squealing noise often points to a failing fan motor bearing. A hissing or bubbling sound may indicate a refrigerant leak. A loud banging or clanking could mean a broken component inside the compressor.
Cost Estimates and Repair vs. Replace Decisions
potential costs helps you make an informed financial decision when your topper fails. Repair is not always the most economical long-term choice. Weigh the age, efficiency, and repair cost of your current unit.
Average Repair Costs for Common Cooling Issues
Prices vary by region and technician, but these ranges provide a general guideline. Labor rates and part availability significantly influence the final bill. Always get a detailed written estimate before authorizing work.
- Capacitor Replacement: $150 – $400. This is a common and relatively affordable repair that often restores cooling immediately.
- Refrigerant Recharge and Leak Repair: $200 – $1,500+. The cost depends heavily on locating and fixing the leak before recharging the system.
- Compressor Replacement: $1,200 – $2,800+. This is a major repair often approaching the cost of a new unit, especially for older toppers.
When to Repair Your Existing Topper
Repair is the best path forward in specific scenarios. A newer unit under warranty should almost always be repaired. Minor, inexpensive fixes on a relatively young system make financial sense.
Choose repair if the issue is simple, like a dirty filter, tripped breaker, or faulty thermostat. If the unit is less than 8 years old and the repair cost is under $500, repairing typically extends its useful life efficiently.
When to Consider Replacing the Entire Unit
Replacement becomes the prudent choice for older, inefficient systems with major failures. New models offer significantly better energy efficiency, which can offset the upfront cost through lower utility bills.
Consider replacement if your topper is over 12 years old, requires frequent repairs, or uses R-22 refrigerant (which is phased out and very expensive). A new compressor failure on an old unit is a strong replacement signal.
Calculate the long-term savings. A new ENERGY STAR certified unit can be 15-20% more efficient. Use the 5,000 Rule: Multiply the repair cost by the age of the equipment. If the result is over 5,000, consider replacing it.
Safety Precautions and When to Avoid DIY Repairs
Your safety is paramount when troubleshooting any appliance. Electricity and refrigerant pose serious risks if handled improperly. Knowing your limits prevents injury and costly mistakes.
Critical Electrical Safety Measures
Always disconnect power at the source before inspecting or touching any internal components. For plug-in units, unplug them. For hardwired systems, turn off the circuit breaker at the main panel.
- Verify Power is Off: Use a non-contact voltage tester on wires and terminals even after switching off the breaker. Never assume a circuit is dead.
- Capacitor Danger: Capacitors store a powerful electrical charge even when power is disconnected. Only a qualified technician should discharge and replace them.
- Avoid Water and Moisture: Never perform electrical work with wet hands or in damp conditions. Keep all tools and components dry.
Handling Refrigerant and Sealed System Repairs
The cooling system is a sealed, pressurized loop. Tampering with it is illegal and dangerous for unlicensed individuals. Refrigerant can cause frostbite and poses environmental hazards.
Never attempt to puncture refrigerant lines or “top off” the refrigerant yourself. A leak must be professionally located and repaired. Only EPA-certified technicians can legally handle and purchase refrigerant.
If you suspect a refrigerant leak (hissing sound, oil residue, poor cooling), turn the system off and call a professional. Inhaling refrigerant fumes or exposing them to an open flame is extremely hazardous.
- Burnt wiring smells or visible damage.
- Any suspicion of a refrigerant leak.
- The need to open the sealed refrigerant system.
- Uncertainty after basic troubleshooting steps.
Recognizing Complex Mechanical Failures
Some problems require specialized tools and diagnostic knowledge. Attempting these repairs without training can cause further damage and increase the final repair bill.
Internal compressor issues, major electrical control board failures, and broken fan motors inside the housing often require professional disassembly. Diagnosing these faults accurately is key to a correct repair.
If your troubleshooting leads you to a complex component like the reversing valve, expansion device, or the compressor itself, it’s time to consult a certified HVAC technician for a safe and guaranteed fix.
Tools and Resources for DIY Topper Troubleshooting
Having the right tools makes diagnosis safer and more accurate. A basic toolkit can help you perform essential maintenance and identify problems. This section outlines what you need and reliable information sources.
Essential Toolkit for Basic Diagnostics
You don’t need a full mechanic’s set for initial checks. These common household and inexpensive specialty tools cover most non-technical troubleshooting steps. Always prioritize safety gear.
- Multimeter: Crucial for checking electrical continuity, voltage, and capacitor function. A basic digital model is sufficient for homeowners.
- Non-Contact Voltage Tester: An indispensable safety tool to verify wires are not live before you touch them. Use it every time.
- Fin Comb and Coil Brush: Gently straighten bent aluminum fins on the condenser coil to restore airflow. The brush removes light debris.
- Flashlight and Inspection Mirror: For peering into dark, cramped spaces within the unit to spot blockages or damage.
Finding Reliable Repair Information and Manuals
Accurate information is key. Avoid generic advice and seek details specific to your topper’s brand and model. The correct schematic or manual provides wiring diagrams and part numbers.
Start by searching for your unit’s model number, located on the data plate. Visit the manufacturer’s official website for manuals and guides. Reputable appliance repair forums often have model-specific threads from technicians and experienced DIYers.
Be wary of vague online videos. Look for content from certified HVAC professionals or established educational channels. Cross-reference any repair steps with your unit’s official documentation.
| Resource Type | Best Use Case | Example/Source |
|---|---|---|
| Manufacturer Manual | Exploded views, part numbers, error codes. | Brand website support section. |
| Technical Service Bulletins | Known issues and factory-authorized fixes for your model. | Appliance repair forums, paid technician portals. |
| Wiring Diagram | Tracing electrical faults and system layout. | Included in manual or available from parts suppliers. |
When to Use Professional-Grade Diagnostics
Some diagnostic tools are cost-prohibitive for one-time use. Technicians use these to pinpoint issues with precision. Knowing they exist helps you understand a pro’s capabilities.
Tools like manifold gauges measure refrigerant pressure, and leak detectors find tiny refrigerant leaks. An ammeter checks compressor amp draw to assess its health. For these complex diagnostics, hiring a professional is more economical than buying the tools.
Best Recommended Cooling Mattress Toppers
If troubleshooting your current topper doesn’t resolve comfort issues, upgrading to a high-quality cooling model can be the ultimate fix. These recommended products are designed for optimal temperature regulation and support.
Serta ThermaGel Cooling, Memory Foam Mattress Topper – Best for Advanced Cooling
This premium topper features Serta’s ThermaGel technology to draw heat away from the body. The memory foam conforms for pressure relief while the cool-to-touch cover enhances comfort. Ideal for hot sleepers seeking a significant temperature reduction.
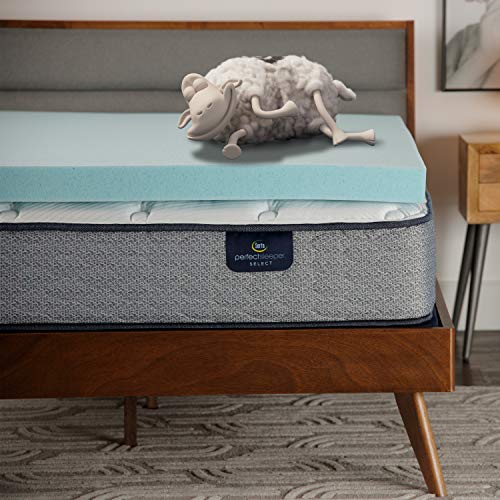
- BREATHABLE GEL-INFUSED FOAM: Engineered with ThermaGel-infused memory foam to...
- COOLING TECHNOLOGY: ThermaGel particles help create a refreshing sleep surface...
- CONTOURING SUPPORT: Adapts and conforms to your body’s natural shape for...
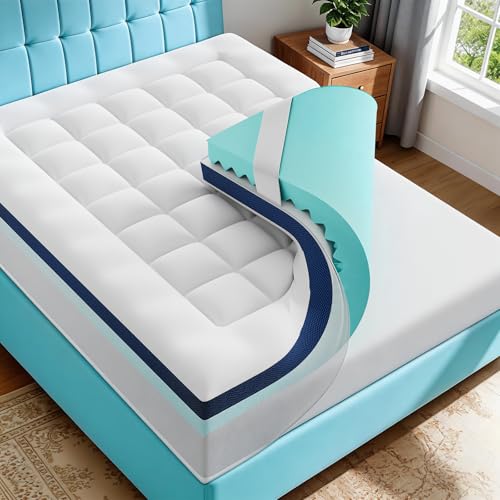
ChiXpace Dual Layer 4 Inch Memory Foam Mattress Topper – Best for Deep Support
Offers a 4-inch dual-layer design with a cooling gel-infused top layer and a high-density support base. This combination provides substantial cushioning and improved spinal alignment. A great option for adding plush comfort and cooling to a firm mattress.
- Dual-Layer Design: This is Queen (60" x 80") size mattress topper. Our mattress...
- Comfortable Support: The memory foam with an egg-crate pattern provides...
- Cooling & Breathable: The ultra-soft fabric and premium gel-infused memory foam...
Zalmureta 4 Inch Dual Layer Memory Foam Mattress Topper – Best Value Option
Delivers effective cooling and support at a competitive price point. Features a breathable, removable cover and certified foam. The dual-layer construction ensures durable comfort, making it an ideal budget-friendly upgrade for better sleep temperature.
- 【4-Inch Dual-Layer Design】Our mattress topper features a 2-inch cooling...
- 【Breathable Design】This mattress topper is designed with Cold Gel Memory...
- 【Effective Body Support】Our mattress topper are ergonomically designed with...
Conclusion
A topper that isn’t cooling properly is often a fixable problem. By systematically checking for airflow blockages, thermostat issues, and power supply faults, you can frequently resolve it yourself.
Remember, regular preventative maintenance is the best strategy to avoid future breakdowns. For complex issues like refrigerant leaks or compressor failure, consulting a professional technician ensures a safe and lasting repair.
Frequently Asked Questions about Why Your Topper Is Not Cooling And How To Fix It Fast
Why is my topper running but not blowing cold air?
This usually means the fan is working but the cooling cycle isn’t engaging. The most common causes are a dirty air filter, blocked condenser coils, or a faulty capacitor preventing the compressor from starting.
First, clean or replace the filter and ensure outdoor coils are clear. If the problem persists, the capacitor may need testing. A refrigerant leak could also be the culprit, requiring a professional diagnosis.
What should I do if my topper is completely frozen over?
Immediately turn the unit off and let it thaw completely, which may take several hours. Never chip at the ice, as this can damage the delicate coils. The ice is a symptom of restricted airflow.
Once thawed, clean the air filter thoroughly and check that all vents are unobstructed. If icing recurs after this, the issue may be low refrigerant or a failing thermostat sensor, necessitating a service call.
How often should I clean or replace the air filter?
You should check your topper’s air filter at least once a month during periods of regular use. A visibly dirty filter restricts airflow and is the leading cause of poor cooling performance and ice buildup.
Most reusable filters can be vacuumed or rinsed with water and left to dry completely. Disposable filters should be replaced as recommended by the manufacturer, typically every 1-3 months.
Is it worth repairing an old topper, or should I replace it?
Use the 5,000 Rule as a guideline: multiply the repair cost by the unit’s age. If the result exceeds 5,000, replacement is often more cost-effective. Also consider a unit over 10-15 years old for an upgrade.
Newer, energy-efficient models can save significantly on energy bills. If the repair is a major one, like a compressor replacement, investing in a new unit usually offers better long-term value and reliability.
What are the signs that I need to call a professional technician?
Call a pro if you suspect electrical issues, smell burning, hear loud grinding noises, or see signs of a refrigerant leak (hissing, oil spots). These indicate serious problems that are unsafe for DIY repair.
You should also seek professional help for any repair involving the sealed refrigerant system, complex electrical components, or if basic troubleshooting steps do not resolve the cooling issue after thorough attempts.
Can a dirty outside unit cause my topper to stop cooling?
Yes, absolutely. The outdoor condenser unit must expel heat. If its coils are clogged with dirt, leaves, or grass, heat cannot dissipate, causing the system to overheat and shut off the cooling cycle as a safety measure.
Ensure there is at least two feet of clearance around the outdoor unit. Gently clean the coils with a garden hose (after turning off power) at the start of each cooling season to maintain peak efficiency.