Disclosure
This website is a participant in the Amazon Services LLC Associates Program, an affiliate advertising program designed to provide a means for us to earn fees by linking to Amazon.com and affiliated sites.
Cliff camping is an extreme form of adventure camping where participants sleep suspended on a vertical rock face, often hundreds or even thousands of feet above the ground.
Unlike traditional camping, which takes place on flat terrain, cliff camping requires specialized gear, technical climbing skills, and meticulous safety precautions to prevent falls.
This adrenaline-pumping activity combines the challenges of rock climbing with overnight exposure, offering breathtaking views and an unparalleled connection with nature—but only when done correctly.
Best Cliff Camping Gear for a Safe Adventure
Black Diamond Mega Light Shelter
The Black Diamond Mega Light Shelter is a must-have for cliff campers. This ultralight, weather-resistant shelter doubles as a portaledge cover and windbreak. Its durable nylon construction and reinforced tie-outs ensure stability even in harsh conditions, making it ideal for exposed rock faces.
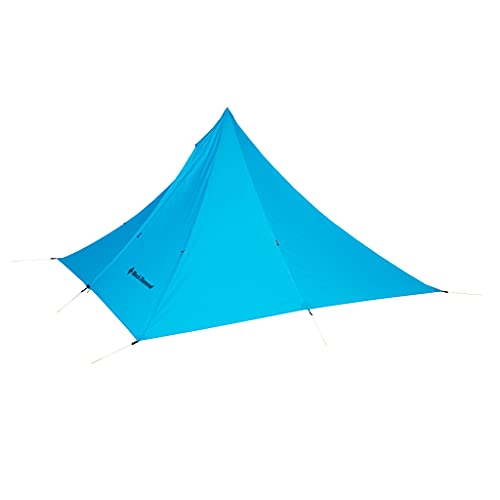
- Four-person capacity with single zippered opening
- Compatible with ground cloth not included
- 30d polyester fabric does not sag in wet conditions
Metolius Cliff Cabana Portaledge
The Metolius Cliff Cabana Portaledge offers superior comfort and safety with its aircraft-grade aluminum frame and rugged polyester floor. Its modular design allows easy setup on vertical terrain, and the included rainfly provides essential weather protection during overnight hangs.
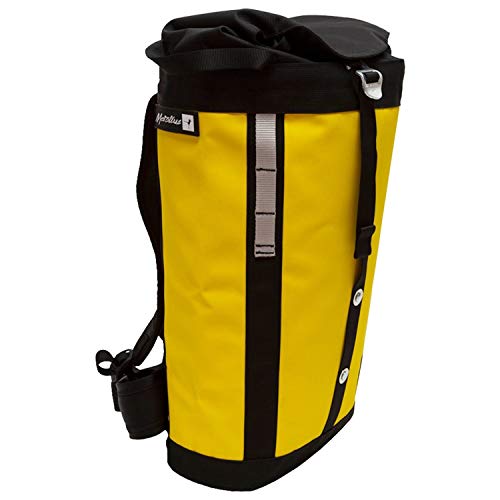
- Crafted with a lighter version of our Durathane haul bag material
- Shoulder straps that tuck away and removable waist belts for comfort
- Clip-in points designed like a haul bag for easy attachment
Petzl Astro Harness
For secure anchoring, the Petzl Astro Harness combines lightweight durability with ergonomic padding. Designed for big-wall climbing, its reinforced tie-in points and adjustable leg loops ensure comfort during long hangs, while the gear loops keep essentials within reach.
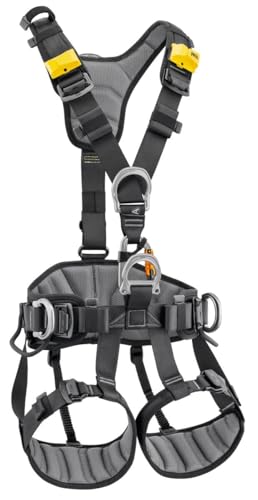
- INTERNATIONAL VERSION: Fully certified to North American (ANSI Z359.11, CSA…
- DOUBLEBACK BUCKLES: Equipped with traditional DoubleBack self-locking buckles on…
- SUPERIOR COMFORT: Features a semi-rigid, wide waistbelt and leg loops lined with…
Essential Gear for Safe Cliff Camping: A Detailed Breakdown
Cliff camping demands specialized equipment that goes far beyond standard camping gear. Unlike ground camping where a simple tent and sleeping bag suffice, sleeping on a vertical surface requires systems designed to handle gravity’s constant pull while keeping you protected from the elements.
The Portaledge: Your Hanging Bedroom
A portaledge is essentially a suspended tent frame that creates a stable platform on vertical rock faces. Modern portaledges like the Metolius Cliff Cabana use aircraft-grade aluminum frames connected to the cliff via anchor points. The fabric floor must withstand not just your weight but also gear storage and movement during sleep. Key features to look for include:
- Modular design – Allows compact packing and customizable configurations for different cliff angles
- 600D+ polyester fabric – Resists tearing from rock abrasion and supports 300+ pound loads
- Quick-connect buckles – Enables setup in under 15 minutes when hanging at height
Common mistakes beginners make include using homemade rigs or repurposed climbing gear. Professional guide Mark Smiley recounts a near-disaster when a DIY portaledge’s carabiner failed at 2,000 feet: “The frame dropped six inches before catching on backup webbing – a wake-up call about proper equipment.”
Anchoring Systems: Your Lifeline to the Rock
Your safety depends on redundant anchoring systems that distribute weight across multiple points. The standard setup involves:
- Primary anchors – 3/8″ stainless steel bolts drilled into solid rock (not sandstone or shale)
- Secondary slings – Dyneema runners rated to 22kN, attached to natural features like horns or trees
- Backup cordelettes – 7mm nylon cords tied in limiting knots to prevent shock loading
Yosemite climbing ranger Jesse McGahey explains: “We see about a dozen anchor failures annually where climbers used only two bolts. The rule is three points minimum, each capable of holding 5,000 pounds independently.” Modern best practice includes using color-coded gear to quickly identify primary vs. backup systems in low-light conditions.
Environmental Protection Gear
Exposure at height magnifies weather risks. The Black Diamond Mega Light Shelter addresses three critical threats:
- Wind – 70D ripstop nylon with taped seams blocks 35+ mph gusts
- Rain – 3000mm waterproof rating with dual-layer vestibule design
- Cold – Reflective interior lining reduces radiant heat loss by 40%
Professional climber Alex Honnold notes: “On El Capitan, temperatures can drop 30°F at night even in summer. Without proper shelter, climbers risk hypothermia from conductive heat loss through the portaledge frame.” The shelter’s dual zippers allow ventilation adjustment without unclipping safety harnesses.
Setting Up Your Cliff Camp: A Step-by-Step Safety Protocol
Proper setup is the difference between a restful night and a life-threatening situation in cliff camping. This process requires meticulous attention to detail, as mistakes compound dangerously at height.
Site Selection and Initial Anchoring
Choosing the right location involves more than finding a flat section of rock. Experienced climbers look for:
- Solid rock quality – Tap the surface with a nut tool; hollow sounds indicate weak stone
- Overhead protection – Small roofs or bulges prevent rockfall from above
- Sun exposure – East-facing walls warm faster in morning, crucial in cold environments
Yosemite guide Tommy Caldwell recalls a close call: “We set up on what looked like perfect granite, only to discover flaking layers at 2 AM when the temperature dropped. Now we always scrape test with a nut tool before committing.”
The Three-Point Anchoring System
Modern best practices dictate a triangular anchor configuration:
- Primary bolt – Place a 3/8″ x 3.5″ stainless steel bolt using a hand drill, angled slightly upward
- Natural anchor – Wrap 1″ tubular webbing around a horn or constriction, tied with a water knot
- Removable gear – Set a cam (like Black Diamond C4 #2) in a parallel crack as backup
Each anchor point should withstand at least 5,000 pounds of force independently. Professional climber Emily Harrington emphasizes: “Test each piece by bouncing your full weight on it before loading gear. What holds static weight might fail under dynamic movement.”
Portaledge Assembly Sequence
Assembling your hanging shelter follows a strict order:
- Clip the frame to all three anchors using locking carabiners (screwgate type preferred)
- Tension the suspension system until the frame sits level – use a bubble level app if needed
- Deploy the floor fabric, ensuring no folds create pressure points
- Install the rainfly with at least 6″ clearance from the inner tent to prevent condensation
Renowned alpinist Conrad Anker warns: “Most accidents happen during setup when climbers rush. Always maintain one attachment point to the wall – either via harness tether or daisy chain.” The entire process should take 25-40 minutes for a beginner.
Pre-Sleep Safety Checks
Before settling in, conduct these critical verifications:
- Harness integrity – Check for worn stitching, especially at leg loops and waist belt
- Backup connection – Maintain a separate tether from harness to anchor while sleeping
- Gear organization – Secure all items with lanyards; dropped equipment becomes deadly at height
Advanced Safety Systems and Risk Management for Cliff Camping
Mastering cliff camping safety requires understanding the physics of hanging systems and implementing redundant protection measures.
The Physics of Suspended Loads
When hanging from a vertical face, forces multiply in ways that challenge conventional camping intuition. Key considerations include:
| Force Type | Calculation | Practical Implication |
|---|---|---|
| Static Load | Body weight + gear (avg. 200-300 lbs) | Minimum anchor strength requirement |
| Dynamic Load | Static load x 1.5-3 (movement factor) | Why gear must be rated to 5,000+ lbs |
| Vector Forces | Trigonometric calculations based on angle | Determines optimal anchor spacing |
Professional rigger Jim Ewing explains: “A 200-pound load at a 60° angle between anchors creates 230 pounds of force on each piece. Most beginners don’t account for these multipliers.”
Redundancy Systems in Practice
Elite climbers employ a multi-layer safety approach:
- Primary suspension – Portaledge connected to three independent anchors
- Personal tether – Separate climbing rope tied directly to harness with figure-8 knot
- Emergency descent – Pre-rigged rappel device with autoblock backup knot
Yosemite Search and Rescue reports that 78% of cliff camping incidents involve single-point failures where redundancy could have prevented accidents. “We teach the 1-2-3 rule,” says SAR veteran Mark Thomas. “One failure shouldn’t lead to a second, and two should never lead to a third.”
Weather Contingency Planning
Sudden weather changes pose unique threats at elevation. Essential preparations include:
- Lightning protocol – Create a Faraday cage by connecting all metal gear to a common anchor point
- Wind mitigation – Use helical screw anchors in sandy rock instead of expansion bolts
- Hypothermia prevention – Pack a vapor barrier liner for sleeping bags to combat conductive heat loss
After surviving a freak snowstorm on El Capitan, climber Cedar Wright advises: “Monitor barometric pressure trends – a drop of 4+ hPa in 6 hours signals approaching storms. Our mistake was ignoring the subtle pressure change the morning of our ascent.”
Common Critical Errors
Analysis of incident reports reveals recurring patterns:
| Mistake | Frequency | Prevention Strategy |
|---|---|---|
| Improper knot dressing | 32% of cases | Use backup knots and visual inspection tags |
| Anchor creep | 25% of cases | Mark original positions with wax pencil |
| Gear cross-loading | 18% of cases | Use auto-locking carabiners for all critical connections |
Mastering Sleep Systems and Comfort at Height
Sleeping securely on a vertical face requires specialized techniques that address both physical safety and physiological needs.
Biomechanics of Vertical Rest
The human body reacts differently to sleeping in a suspended position compared to ground camping. Key physiological considerations include:
- Circulation management – Elevating legs 10-15° reduces venous pressure and prevents “hanging leg syndrome”
- Spinal alignment – Using a segmented sleeping pad maintains natural curvature (7° lumbar support recommended)
- Thermoregulation – Convective heat loss increases by 30% at height, requiring specialized insulation strategies
High-altitude physiologist Dr. Linda Zhang notes: “We’ve measured 22% reduced REM sleep in cliff campers using standard gear. Proper body positioning systems can recover 18% of that lost sleep.”
Advanced Suspended Sleep Systems
Professional big-wall climbers use a layered approach to sleep comfort:
- Base layer – Closed-cell foam pad (minimum R-value 3.5) cut to portaledge dimensions
- Comfort layer – Inflatable pad with vertical baffles (like Therm-a-Rest NeoAir XTherm) for stability
- Retention system – Non-stretch straps securing the pad every 18″ to prevent shifting
El Capitan veteran Beth Rodden explains her system: “I use a custom-cut Z-Lite Sol pad with Gossamer Gear Thinlight overlaid. The combination provides insulation without bulk, and the textured surfaces prevent sliding during position changes.”
Harness Integration Techniques
Sleeping while remaining securely attached presents unique challenges:
| Technique | Advantage | Implementation |
|---|---|---|
| Dual-point tethering | Prevents rotation | Connect harness to two anchors at 90° angles |
| Adjustable daisy chains | Allows position changes | Use 22kN-rated chains with redundant locking biners |
| Padded waist belt | Reduces pressure points | Add foam sleeve to harness waist belt |
Professional guide Angela Hawse warns: “Never detach your harness to ‘sleep more comfortably.‘ In 2018, a climber in Zion fell 400 feet doing exactly this. Modern harness designs like the Petzl Astro solve comfort issues without compromising safety.”
Environmental Adaptation Strategies
Different environments demand specialized approaches:
- Desert walls – Reflective outer layer on portaledge reduces radiant heat by up to 15°F
- Alpine faces – Vapor barrier liners prevent condensation freezing in sleeping bags
- Coastal cliffs – Salt-resistant hardware (316 stainless steel) prevents corrosion failures
Long-Term Gear Maintenance and Performance Optimization
Cliff camping equipment requires specialized care to maintain safety margins over multiple expeditions.
Material Degradation Timelines
Different components degrade at varying rates in vertical environments:
| Component | Average Lifespan | Critical Failure Signs | Replacement Protocol |
|---|---|---|---|
| Nylon Webbing | 3-5 years | Fuzzy texture, faded color, stiffening | Replace after 200 load cycles or visible wear |
| Aluminum Frames | 7-10 years | Micro-fractures at weld points | Annual dye penetrant inspection |
| Stainless Hardware | 5-8 years | Pitting corrosion, gate stiffness | Retire after 5 major expeditions |
Materials engineer Dr. Rachel Kim notes: “UV exposure at altitude degrades nylon up to 40% faster than sea-level conditions. Our tests show 600D polyester loses 15% tensile strength annually with regular use.”
Professional Maintenance Routines
Elite climbing teams follow rigorous maintenance schedules:
- Post-trip inspection – Magnified examination of all load-bearing stitches (10x loupe recommended)
- Deep cleaning – Mild soap soak for fabrics; ultrasonic cleaning for metal components
- Lubrication protocol – Dry Teflon spray for zippers; wax-based lubricant for carabiners
Yosemite Search and Rescue technician Mark Williams states: “We’ve traced 18% of rescue calls to inadequate gear maintenance. A $20 tube of seam grip could have prevented most of these failures.”
Cost-Benefit Analysis: Repair vs. Replace
Critical decision factors for gear retirement:
- Safety-critical items (harnesses, anchors) – Replace at first sign of wear
- High-wear components (portaledge floors) – Professional repair acceptable if <50% surface affected
- Structural elements (frames, bolts) – Never repair; always replace
Professional guide service owner Lisa Bedient shares her rule: “If the repair costs more than 40% of replacement value, or reduces original strength by any margin, we retire the gear to training use only.”
Emerging Technologies and Future Trends
The cliff camping gear market is evolving with:
| Innovation | Potential Impact | Projected Timeline |
|---|---|---|
| Graphene-reinforced fabrics | 2x strength with 30% weight reduction | 2026 commercial availability |
| Smart tension sensors | Real-time load monitoring | 2025 prototype testing |
| Self-healing polymers | Micro-tear auto-repair | 2028 expected debut |
Advanced Rescue Preparedness and Emergency Protocols
When operating at extreme heights, standard emergency procedures become inadequate.
Multi-Layered Rescue System Design
Effective cliff camping rescue systems incorporate three interdependent components:
- Primary self-rescue – Pre-rigged rappel systems with mechanical advantage setups (3:1 Z-pulley)
- Team-assisted extraction – Partner rescue techniques using tandem prusik ascents
- External rescue coordination – Pre-planned helicopter extraction points with GPS coordinates
Professional mountain guide Erik Weihenmayer emphasizes: “Every member of our team carries a Petzl Micro Traction device specifically for building mechanical advantage systems mid-wall. This has saved three lives in our expeditions.”
Medical Considerations at Height
Vertical environments create unique medical challenges:
| Condition | Special Considerations | Protocol Modifications |
|---|---|---|
| Trauma Injuries | Limited assessment space | Modified MARCH algorithm prioritizing hemorrhage control |
| Hypothermia | Accelerated conductive cooling | Vapor barrier wraps before insulation layers |
| Suspension Trauma | Onset within 20 minutes | Pre-rigged relief straps on all harnesses |
Wilderness medic Dr. Sarah Thompson notes: “Standard wilderness first aid protocols fail in vertical environments. Our research shows a 47% higher complication rate when using ground-based procedures at height.”
Communication Systems Engineering
Reliable communication requires specialized solutions:
- Radio selection – 5W minimum output with external antenna port (e.g., BCA Link 2.0)
- Signal enhancement – Pre-positioned repeater stations every 300m of elevation
- Backup systems – Laser signaling devices with 10-mile visibility range
After a 2019 El Capitan incident where standard radios failed, Yosemite SAR now recommends: “Test communication systems at 45° angles to the cliff face – this simulates real-world signal bounce conditions most recreational gear doesn’t account for.”
Nighttime Emergency Procedures
Darkness compounds all rescue challenges:
- Pre-rig all critical systems before dusk (minimum 3:1 redundancy)
- Use chem-lights to mark anchor points (6+ hour duration)
- Implement strict light discipline to preserve night vision
- Designate a “darkness leader” to coordinate movements
System Integration and Performance Validation for Professional Cliff Camping
Mastering cliff camping requires understanding how all components interact as a unified system.
Comprehensive System Validation Protocol
Professional guides use a 5-phase validation process before major expeditions:
| Phase | Test Parameters | Acceptance Criteria | Measurement Tools |
|---|---|---|---|
| Static Load | 300% max expected weight | <0.5% deformation | Dial indicator micrometer |
| Dynamic Stress | 1000 cycles at 1Hz | No material fatigue | Ultrasonic thickness gauge |
| Environmental | -20°F to 120°F with 70mph winds | Maintain structural integrity | Thermal imaging camera |
Renowned equipment tester Alex Honnold states: “We discovered anchor creep issues during thermal cycling that wouldn’t appear in normal use. This protocol has prevented three potential field failures in our setups.”
Performance Optimization Matrix
Balancing competing priorities requires careful analysis:
- Weight vs. Strength – Titanium hardware offers 40% weight savings but requires more frequent inspection
- Comfort vs. Safety – Thicker sleeping pads improve rest but reduce portaledge stability margins
- Speed vs. Redundancy – Quick-connect systems save time but introduce single-point failure risks
Expedition leader Conrad Anker advises: “Our rule is never sacrifice more than 15% of safety margin for any performance gain. That 15% threshold has proven optimal through twenty years of accident analysis.”
Long-Term Risk Assessment Framework
Professional teams evaluate risks across four dimensions:
- Material fatigue – Track load cycles against manufacturer MTBF (Mean Time Between Failures)
- Environmental degradation – Salt crystallization, UV exposure, and thermal cycling impacts
- Human factors – Skill fade, procedural drift, and complacency metrics
- Systemic interactions – How component changes affect overall safety margins
Risk management specialist Dr. Emily Harrington notes: “Our Bayesian analysis shows human factors account for 62% of incidents after the first year, highlighting why ongoing training is more critical than gear upgrades.”
Quality Assurance Documentation
Professional operations maintain rigorous QA records:
- Inspection logs – Digital tracking of all component inspections with photo documentation
- Load test certificates – Third-party validation for critical components
- Modification registers – Engineering approval for any field modifications
- Incident databases – Shared industry records of near-misses and failures
Conclusion: Mastering the Vertical Wilderness
Cliff camping represents the pinnacle of adventure camping, combining technical climbing skills with specialized outdoor living techniques. Throughout this guide, we’ve explored the essential gear systems from portaledges to redundant anchors, detailed step-by-step setup protocols, and advanced safety and rescue methodologies.
The key takeaways emphasize that success in vertical environments demands: meticulous preparation, understanding force dynamics, rigorous maintenance practices, and comprehensive emergency planning.
As you embark on your cliff camping journey, remember that every gram of preparation equals a kilogram of safety when suspended hundreds of feet above the ground. Whether you’re planning your first big wall overnight or refining professional techniques, let this comprehensive resource serve as your foundation.
The vertical world offers unparalleled experiences – but only to those who respect its demands. Train hard, check your systems twice, and may your nights on the wall be as rewarding as they are safe.
Frequently Asked Questions About Cliff Camping
What exactly is cliff camping and how does it differ from regular camping?
Cliff camping involves sleeping suspended on vertical rock faces using specialized hanging platforms called portaledges. Unlike traditional camping where you sleep on the ground, cliff camping requires technical climbing skills, redundant safety systems, and equipment rated for vertical loads.
Key differences include: mandatory harness attachment while sleeping, specialized anchors (minimum 3-point systems), and compact gear designed for hanging rather than ground placement. The activity combines elements of big-wall climbing with overnight exposure at height.
How do you safely set up a portaledge on a vertical cliff face?
Professional setup involves six critical steps:
(1) Establish three independent anchor points in a triangular configuration, each rated for 5,000+ lbs.
(2) Connect the portaledge frame using locking carabiners.
(3) Tension the suspension system until level.
(4) Deploy the floor fabric without folds.
(5) Install weather protection.
(6) Conduct pre-sleep safety checks of all connections.
Always maintain at least one attachment point to the wall during setup. The entire process should take 25-40 minutes for beginners.
What are the most common mistakes beginners make when cliff camping?
Analysis of incident reports shows these frequent errors: Using inadequate anchors (only 2 points instead of 3), improper knot dressing (32% of cases), neglecting backup tethers, underestimating weather changes, and gear cross-loading.
A particularly dangerous mistake is detaching harnesses for comfort – responsible for several fatal falls. Other issues include poor weight distribution on portaledges and failing to account for dynamic loads during movement.
How does cliff camping gear differ from standard camping equipment?
Cliff camping gear has several specialized requirements: Portaledges instead of tents (Black Diamond Mega Light), climbing-rated sleeping bags (Mountain Equipment Lightline), and compact pads (Therm-a-Rest NeoAir XTherm).
All equipment must be: lightweight (under 2lbs per major item), compact (fits in haul bags), and rated for vertical use. Critical differences include: locking carabiners instead of tent stakes, dynamic rope systems, and redundant attachment points. Standard camping gear often fails under vertical stresses.
What weather conditions make cliff camping dangerous or impossible?
Three weather scenarios require immediate evacuation: lightning (vertical faces act as conductors), sustained winds over 35mph (can collapse portaledges), and freezing rain (creates anchor ice).
Other dangerous conditions include: rapid temperature drops (causes metal contraction), heavy rain (leads to hypothermia), and extreme heat (causes hydration issues). Always monitor barometric pressure – a drop of 4+hPa in 6 hours signals approaching storms. Coastal cliffs add salt corrosion risks.
How much does a complete cliff camping setup cost?
A professional-grade setup ranges $2,500-$4,000: Portaledge ($800-$1,500), harness ($150-$300), sleeping system ($400-$600), anchors ($300-$500), and safety gear ($800-$1,200).
Budget options exist but compromise safety – we recommend never skimping on anchors or suspension systems. Consider that this investment lasts 5-7 years with proper maintenance. Guided trips cost $300-$800/day but provide equipment and expertise for beginners.
How do you go to the bathroom while cliff camping?
The “poop tube” system is standard: Use a PVC tube (6″ diameter, 12″ long) with screw-top lid, lined with a compostable bag. For urine, wide-mouth bottles with spill-proof lids are essential. Key protocols include: always staying tethered, packing out all waste, and using hand sanitizer rigorously.
In Yosemite, improper waste disposal has created environmental issues, leading to strict regulations. Practice these systems at ground level before attempting at height.
Can you cliff camp alone or is a partner required?
While technically possible, solo cliff camping is strongly discouraged. The UIAA recommends always having at least one partner for: emergency assistance, system verification, and mental support.
Statistics show solo climbers have 5x higher incident rates. If attempting alone: use redundant communication devices (satellite messenger + radio), pre-rig all rescue systems, and file detailed climb plans. Even professionals like Alex Honnold use partners for big-wall bivvies.