Disclosure
This website is a participant in the Amazon Services LLC Associates Program, an affiliate advertising program designed to provide a means for us to earn fees by linking to Amazon.com and affiliated sites.
Setting up an adjustable bed at home is a straightforward DIY project. You can complete it in under an hour with basic tools. This guide provides the expert steps for a safe and correct installation.
Proper assembly is crucial for maximizing your bed’s comfort and health benefits. A correct setup ensures smooth operation and prevents potential damage. It transforms your bedroom into a personalized relaxation zone.
Best Adjustable Bed Frames for Home Setup
Acidbolt Adjustable Bed Frame – Best Overall Quiet Base
The Acidbolt Adjustable Bed Frame features a near-silent brushless motor system designed for minimal operational noise. Its robust, all-metal frame construction prevents squeaks and rattles. This is the ideal choice for light sleepers who prioritize whisper-quiet adjustments and premium build quality.
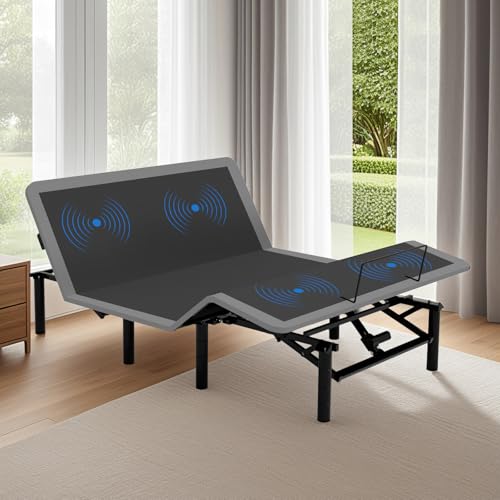
- 🛌 Five-Zone Massage Therapy: Unwind with five customizable massage modes and…
- 🛌 Guided Nighttime Convenience: Navigate safely in the dark with the…
- 🛌 Dual-Port Charging Hub: Stay connected with both Type-A and Type-C USB…
iDealBed 5i Custom Adjustable Bed base – Best for Smart, Quiet Adjustments
iDealBed 5i Custom Adjustable Bed base uses a smooth-glide articulation system that reduces mechanical grinding sounds. Its integrated smart home compatibility allows for quiet, scheduled position changes. This model is recommended for tech-savvy users seeking a seamless and quiet smart bed experience.
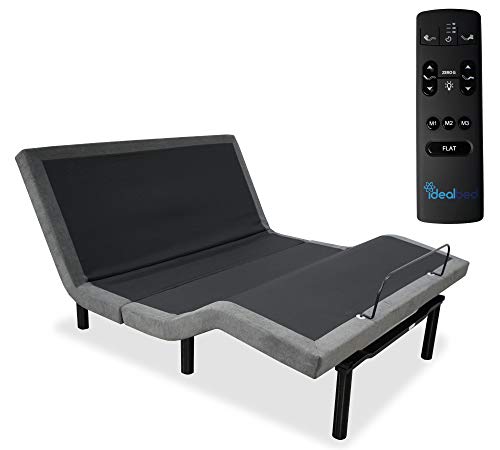
- Enhance your comfort and sleep with full head and foot articulation the Head…
- Luxurious Interactive Wireless Ergonomic Remote, Back-Lit and marked function…
- Advanced Smooth and Silent Drive Technology Motors, German engineered motors to…
Reverie R650 – Best Value Quiet Performance
The Reverie R650 offers excellent quiet operation with its dual ultra-quiet motors and a solid, rattle-free wooden slat system. It provides powerful lift at a more accessible price point. This is the best option for those seeking reliable, quiet functionality without the premium brand price tag.

- This is Reverie’s latest model (R650) featuring the best tech in the industry…
Essential Tools and Preparation for Your Adjustable Bed Setup
Proper preparation is the key to a smooth installation process. Gathering the right tools beforehand saves significant time and frustration. This section details everything you need before you start assembling your new adjustable bed frame.
Required Tools and Equipment Checklist
Most adjustable bed frames come with the necessary hardware. You will, however, need a few basic tools from your home. Having these ready creates an efficient workspace.
- Power Drill/Driver: A cordless drill with a Phillips head bit dramatically speeds up assembly. It is essential for tightening numerous bolts securely.
- Measuring Tape: Use this to ensure the frame is centered in your room. It also helps verify clearance for walls and nightstands.
- Assistant: Some components, like the main frame, are large and awkward. A second person is crucial for safety and ease of handling.
Pre-Assembly Room and Box Preparation
Prepare your space to prevent damage and streamline the process. A clear, organized area is a non-negotiable first step for a successful setup.
First, clear the floor area where the bed will reside. Remove any rugs or obstacles. Ensure you have a clear path from your doorway to the setup location.
Next, carefully unbox all components in the room. Lay out parts and group hardware according to the instruction manual. Check the packing list against all items to confirm nothing is missing before you begin.
Key Preparation Takeaways
- Gather a power drill, measuring tape, and an assistant.
- Clear the floor area and create an unobstructed path.
- Unbox, inventory, and organize all parts before starting assembly.
Step-by-Step Guide to Assembling Your Adjustable Frame
Following a logical assembly sequence is crucial for safety and functionality. This section provides a clear, step-by-step process for putting your adjustable bed frame together. Always prioritize the manufacturer’s specific instructions over generic advice.
Connecting the Main Frame and Legs
Begin by laying the side rails and center support bar on the floor. Connect them using the provided bolts and brackets. Ensure all connections are square and tight before proceeding.
Next, attach the legs or pedestals to the bottom of the assembled frame. Use your power drill to secure them firmly. This creates a stable base that will support the weight of the mattress and occupants.
Installing the Motors and Articulating Deck
Locate the head and foot motor units. They typically mount onto brackets on the side rails. Secure them according to the manual’s diagram, ensuring the wiring harness is accessible.
Then, attach the articulating deck sections to the motor arms. This is often a pin-and-clip or bolt-on process. Confirm each section moves freely without obstruction before adding the mattress.
- Assemble the Base Frame: Connect side rails and center support bar securely.
- Attach the Support Legs: Fix all legs to the frame for stable elevation.
- Mount the Motors: Secure head and foot motors to their designated brackets.
- Connect the Deck: Link the moving deck panels to the motor arms.
Assembly Safety Tips
- Do not plug in the bed until assembly is fully complete and checked.
- Keep fingers clear of moving parts and pinch points during assembly.
- Double-check all bolt tightness to prevent squeaking and instability.
Wiring, Mattress Placement, and Final Configuration
The final phase involves connecting electrical components and ensuring everything works perfectly. This stage transforms the assembled frame into a fully functional adjustable bed. Careful attention here prevents operational issues later.
Connecting Power and Syncing the Remote
Route the power cords from both motors to the head of the bed. Plug them into the central control box, which then connects to the wall outlet. Ensure cables are not pinched under the frame.
Insert batteries into the wireless remote. Power on the bed using the control box or a button on the remote. Follow the manual’s instructions to sync or pair the remote with the base, which often involves holding specific buttons.
Positioning Your Mattress and Final Checks
With the frame flat, carefully center your mattress on the articulating deck. An adjustable base mattress or a flexible hybrid is ideal. Ensure no part of the mattress overhangs the moving sections.
Perform a full operational test. Use the remote to raise and lower the head and foot sections through their full range. Listen for smooth motor operation and watch for any hesitation or misalignment.
| Checklist Item | Purpose |
|---|---|
| Secure Cable Management | Prevents tripping hazards and wire damage. |
| Remote Control Syncing | Ensures reliable wireless communication. |
| Centered Mattress Placement | Prevents uneven wear and ensures smooth articulation. |
| Full Range Motion Test | Verifies motor function and deck stability. |
Post-Setup Configuration Tips
- Program any memory positions (like zero-gravity) for one-touch adjustment.
- Adjust the retainer bar (if included) to prevent mattress slippage.
- Familiarize yourself with massage settings and timer functions for optimal use.
Troubleshooting Common Adjustable Bed Setup Issues
Even with careful assembly, you might encounter minor hiccups. This troubleshooting guide addresses the most common problems during and after setup. Most issues have simple solutions you can perform yourself.
Resolving Power and Remote Control Problems
If the bed does not power on, first check the obvious. Ensure the power cord is firmly plugged into a working wall outlet. Verify that the control box is securely connected to both motor plugs.
For remote issues, start by replacing the batteries with new ones. If unresponsive, re-sync or re-pair the remote with the base using the manual’s reset procedure. Ensure no large metal objects are blocking the signal.
Fixing Noise, Movement, and Alignment Issues
Squeaking or grinding noises often indicate loose hardware. Go back and tighten all bolts, especially where the legs and motors attach. A small amount of furniture wax on metal contact points can also reduce friction.
If the deck sections move unevenly or jerkily, check for obstructions. Ensure the mattress is centered and not catching on the headboard or wall. The frame itself must be on a level, solid floor surface.
- No Power: Check outlet, power cord connections, and circuit breaker.
- Remote Not Working: Replace batteries, re-sync remote, check for interference.
- Unusual Noise: Tighten all bolts and apply lubricant to joints if permitted.
- Uneven Movement: Center the mattress, remove obstructions, level the frame.
When to Contact Customer Support
Seek professional help for specific problems. Do not attempt to repair electrical components yourself.
- A motor hums but does not move the deck at all.
- You notice a burning smell or see damaged wires.
- A critical part was missing from the box or arrived broken.
Maintenance and Care for Your Adjustable Bed Base
Proper maintenance ensures your adjustable bed provides years of reliable comfort. A simple routine prevents common wear-and-tear issues. This care extends the life of motors, joints, and upholstery.
Routine Cleaning and Inspection Schedule
Dust and vacuum under the bed frame monthly to prevent debris from entering motors. Wipe down the upholstered sides with a damp cloth as needed. Avoid harsh chemical cleaners that could damage the fabric or finish.
Conduct a quarterly inspection of all mechanical parts. Check that bolts and screws remain tight. Listen for new or unusual sounds during operation, which can be early warning signs.
Protecting Motors and Moving Parts
The motors and articulating joints are the heart of your bed. Never exceed the maximum weight capacity listed in your manual. This prevents motor strain and potential failure.
Avoid placing heavy objects on the moving deck when it is in a raised position. Periodically check that the path of movement is clear of blankets, cords, or pets to prevent jams.
| Maintenance Task | Frequency | Key Benefit |
|---|---|---|
| Dust & Vacuum Under Frame | Monthly | Prevents motor clogging and overheating. |
| Tighten Hardware Check | Every 3-6 Months | Eliminates squeaks and maintains structural integrity. |
| Full Range Motion Test | Monthly | Ensures smooth operation and identifies issues early. |
| Clean Upholstery | As Needed | Preserves appearance and material longevity. |
Proactive Care Tips
- Use a surge protector for the power cord to safeguard electronics.
- If storing the bed, keep it in a flat position to relieve tension on motors.
- Refer to your warranty for specific care requirements to keep it valid.
Expert Tips for Optimizing Your Adjustable Bed Experience
Once your bed is set up, you can fine-tune it for maximum benefit. These expert tips go beyond the manual to enhance comfort, health, and convenience. Small adjustments can make a significant difference in your daily use.
Finding Your Perfect Sleep and Lounge Positions
Experiment slowly to discover what feels best for your body. The zero-gravity position (where knees and head are slightly elevated) is excellent for reducing spinal pressure. It promotes circulation and can ease back pain.
For reading or watching TV, raise the head section just enough to support your neck comfortably. Avoid extreme angles that strain your neck. Use the foot articulation to prevent sliding down the mattress.
Integrating with Bedroom Furniture and Accessories
An adjustable base may require compatible bedroom furniture. Ensure your headboard is attached using the correct mounting brackets. Consider a split-king adjustable base for couples with different comfort preferences.
Use adjustable bed sheets with deep pockets and elastic all around. Place a non-slip mattress pad between the mattress and deck for added stability. Manage cords with clips or sleeves to maintain a clean look.
- For Acid Reflux: Elevate the head section 6-8 inches to use gravity for relief.
- For Snoring: A slight head elevation can open airways and reduce snoring.
- For Leg Circulation: Gently raise the foot section to reduce swelling.
- For Entry/Exit: Use the flat incline feature to make getting in and out of bed easier.
Advanced Optimization Checklist
- Program memory buttons for your favorite sleep, lounge, and TV positions.
- Use the massage timer function to help you fall asleep, not disturb you later.
- Ensure all bedding (linens, blankets, duvets) is flexible enough to bend with the base.
Safety Precautions and Best Practices for Daily Use
Safety is paramount when using any piece of powered furniture. Following these guidelines protects you, your bed, and your family. They ensure your adjustable bed remains a safe haven for relaxation.
Essential Electrical and Weight Safety Rules
Always plug your adjustable base directly into a wall outlet, not an extension cord. Use a surge protector to guard against power spikes. Never operate the bed if the power cord or control box appears damaged.
Strictly adhere to the manufacturer’s stated maximum weight capacity. This limit includes the combined weight of the mattress, bedding, and all occupants. Exceeding it can damage motors and compromise structural integrity.
Preventing Pinch Points and Ensuring Clearance
The moving parts of the frame create potential pinch points. Keep hands, feet, and loose clothing clear while the bed is adjusting. Always supervise children and pets around the operating bed.
Maintain adequate clearance from walls, headboards, and nightstands. The mattress and deck need space to articulate fully without obstruction. This prevents damage to your bed and bedroom furniture.
- Inspect Regularly: Check for loose screws, frayed wires, or unusual sounds monthly.
- Operate Smoothly: Use the remote to make gradual position changes, not sudden jerks.
- Secure the Area: Ensure no objects are on the floor under the bed where mechanisms move.
- Know the Emergency Stop: Locate the manual flat button or power cutoff in case of malfunction.
Critical Safety Don’ts
- Do not allow children to use the remote or play on the moving bed.
- Do not place the bed where it could trap cords from blinds or heaters.
- Do not attempt to disassemble or repair electrical components yourself.
Conclusion: Mastering Your Adjustable Bed Setup at Home
Setting up an adjustable bed at home is a manageable project with the right guidance. You can achieve professional results that enhance your sleep and wellness. Proper assembly unlocks the full potential of your investment.
The key takeaway is to follow a methodical process: prepare, assemble, wire, and test. Regular maintenance and safe operation ensure long-lasting performance. Your new bed is now ready to deliver customized comfort.
We encourage you to experiment with different positions to find your perfect setting. Refer back to our troubleshooting tips if any minor issues arise. Enjoy the profound benefits of your personalized sleep environment.
You have successfully transformed your bedroom into a sanctuary of rest and recovery. Sleep well and wake up refreshed.
Frequently Asked Questions About Setting Up an Adjustable Bed
What tools do I need to set up an adjustable bed frame?
You typically need a cordless power drill with a Phillips head bit, a measuring tape, and an assistant. Most hardware is included. The drill significantly speeds up assembly and ensures bolts are secure. An assistant helps safely maneuver the larger frame components.
Always check your specific manual for any unique tool requirements. Having these items ready before you start creates a smooth, efficient setup process and prevents mid-assembly delays.
How long does it take to assemble an adjustable bed?
For most people, the full assembly takes 45 to 90 minutes. This includes unboxing, building the frame, installing motors, and testing. Having a second person can cut this time considerably by simplifying the handling of large parts.
The time varies based on the model’s complexity and your DIY experience. Rushing can lead to mistakes, so it’s best to allocate a relaxed two-hour window to complete the job properly.
Can I use my existing mattress on an adjustable base?
You can use your existing mattress if it is flexible. Memory foam, latex, or hybrid mattresses work best. Traditional innerspring mattresses are often too rigid and may be damaged or hinder movement.
Check your mattress warranty, as some require use with an adjustable base. For optimal performance and longevity, a mattress specifically designed for articulation is the best option.
Why is my adjustable bed remote not working after setup?
First, replace the remote’s batteries with new ones. If that fails, re-sync it with the base using the reset procedure in your manual. Ensure no large metal objects are blocking the signal between the remote and receiver.
Also, verify the bed is plugged in and the outlet has power. If problems persist, consult the troubleshooting guide or contact customer support for your specific brand.
What is the best way to prevent mattress slippage on an adjustable base?
Use a non-slip mattress pad or gripper sheet between the mattress and the deck. Ensure your adjustable bed sheets have deep pockets and strong elastic all around. These create friction and hold everything in place.
Many adjustable bases include a retainer bar at the foot of the bed. Install and adjust this bar according to your manual to act as a physical stop, preventing the mattress from sliding down.
How do I move an adjustable bed frame to a different room?
First, lower the frame completely to its flat position and unplug it. Remove the mattress and all bedding. Disconnect the power cords from the control box. You may need to detach the legs or center support for tight doorways.
It’s safest to disassemble the main frame into its largest manageable sections. Always lift with your legs, not your back, and use furniture sliders to protect your floors during the move.
Is it safe to use an adjustable bed every night?
Yes, adjustable beds are designed for nightly use. They are engineered to withstand frequent position changes. Regular use for sleeping is their primary function and is completely safe when set up and used correctly.
Adhere to the weight limit and perform recommended maintenance. The health benefits of finding an optimal sleep position make nightly use not only safe but potentially beneficial for circulation and back pain.
What should I do if my adjustable bed makes a loud grinding noise?
A loud grinding noise often indicates an obstruction or a loose part. Immediately stop using the bed and lower it to flat. Check for items trapped in the mechanism and ensure the mattress is centered and not catching.
Inspect and tighten all bolts connecting the legs, frame, and motor brackets. If the noise persists after checking for obstructions and tightening hardware, contact customer support, as it may indicate a motor issue.