Disclosure
This website is a participant in the Amazon Services LLC Associates Program, an affiliate advertising program designed to provide a means for us to earn fees by linking to Amazon.com and affiliated sites.
If your mattress doesn’t fit snugly against your sleigh bed’s curved headboard or footboard, leaving an annoying gap, there are several effective ways to close that space for a seamless, polished look.
A poorly fitted mattress not only looks unappealing but can also cause discomfort, reduce support, and even lead to premature mattress wear. Fortunately, solving this issue is easier than you might think—whether you need a simple DIY fix, a specialized mattress gap filler, or an adjustable bed frame solution.
Best Gap Fillers for Sleigh Bed and Mattress
If you’re struggling with an unsightly gap between your sleigh bed and mattress, these three high-quality products can help create a seamless, snug fit while improving comfort and aesthetics.
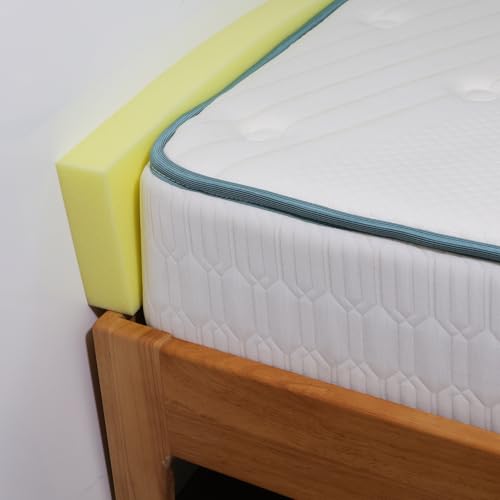
Foam Factory Mattress Gap Filler
This high-density foam wedge is specifically designed to fill gaps between mattresses and headboards. Available in multiple thicknesses (1″ to 4″), it provides firm support and won’t compress over time. The tapered design blends seamlessly with most sleigh bed curves, and its breathable foam prevents heat retention.
- ✂️【CUSTOM LENGTH SOLUTION】 – This bed gap filler comes as a 2-meter…
- 🟡【PURE HIGH-DENSITY FOAM】 – Made of high density yellow sponge (no fabric…
- 📦【VACUUM-PACKED FOR SHIPPING】 – Compressed for eco-friendly delivery…
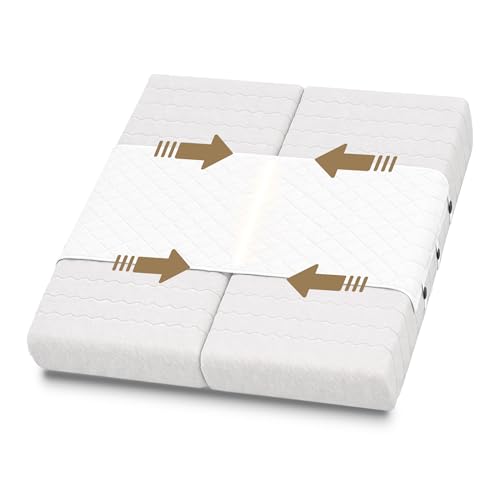
Split King Gap Filler for Adjustable Bed
This innovative stretchable band system wraps around your mattress to pull it firmly against the headboard. The heavy-duty elastic straps with secure buckles work with all mattress types (up to 18″ thick) and can reduce gaps up to 6 inches without damaging your bed frame.
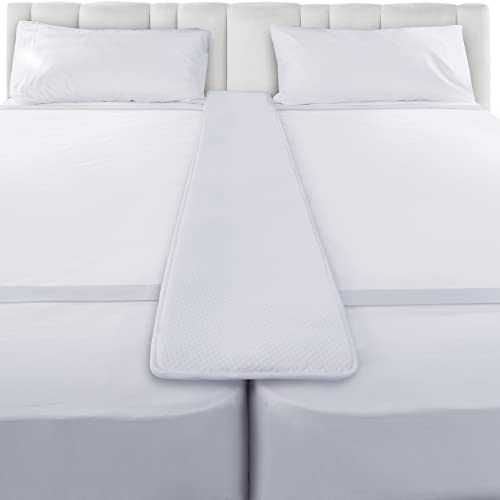
FeelAtHome Premium Bed Bridge
For larger gaps (up to 12 inches), this dual-layer memory foam bridge creates a smooth transition between mattress and headboard. The 4″ thick orthopedic-grade foam conforms to sleigh bed curves while providing pressure relief. Includes a removable, washable bamboo cover for easy maintenance.
- Effortless Bed Conversion: Transform your sleeping arrangements this winter by…
- Simple Installation Process: Achieve the ideal king bed setup for your winter…
- Ideal for Guest Accommodations: Make your home guest-ready this festive season…
Why Gaps Form Between Sleigh Beds and Mattresses
Before fixing the gap between your sleigh bed and mattress, it’s crucial to understand why these spaces occur in the first place. Unlike standard flat headboards, sleigh beds feature distinctive curved designs that create unique fitting challenges.
The graceful arcs that make these beds visually striking are precisely what causes most mattress fitting issues.
Design Factors Contributing to Gaps
Sleigh beds typically have three design elements that affect mattress fit:
- Curved Headboard/Footboard: The signature sweeping curves leave triangular gaps at the sides where straight-edged mattresses can’t conform
- Elevated Frame Design: Many sleigh beds sit higher than standard frames, creating vertical space between mattress and headboard
- Fixed Side Rails: Non-adjustable side panels prevent pushing the mattress flush against the curved surfaces
Common Measurement Mismatches
The most frequent sizing issues occur when:
- Mattress Width vs. Bed Frame: A standard queen mattress (60″ wide) may measure 58-59″ across the sleeping surface while the frame accommodates the full 60″ including side handles
- Mattress Thickness Changes: Replacing an old 8″ mattress with a 12″ model often reveals new gaps due to the height difference
- Manufacturing Tolerances: Even “matching” bed and mattress sets can have 1-2″ variances due to production differences
Material Considerations
Different mattress types behave uniquely in sleigh beds:
Memory foam mattresses tend to conform slightly better to curves but may still leave gaps at the edges where support foam remains rigid. Innerspring mattresses maintain their rectangular shape most stubbornly, while hybrid models often show a combination of these behaviors.
Latex mattresses, being more flexible, sometimes bridge small gaps naturally but lack the structural rigidity to fill larger spaces.
Step-by-Step Guide to Measuring Your Sleigh Bed Gap Accurately
Precise measurements form the foundation for solving your sleigh bed gap issues effectively. Unlike standard bed measurements, sleigh beds require specialized measuring techniques to account for their curved surfaces and potential uneven gaps.
Essential Tools for Measurement
Gather these tools before starting:
- Flexible tape measure (for following curved surfaces)
- Straightedge ruler (for checking level surfaces)
- Digital calipers (for precise thickness measurements)
- Notebook and pencil (for recording multiple measurements)
- Smartphone level app (optional for checking angles)
Measurement Process
- Measure the Horizontal Gap: With mattress properly positioned, measure from the mattress edge to the headboard at three points – top, middle, and bottom of the curve. Sleigh beds often have varying gaps due to their curvature.
- Determine Vertical Space: Measure from the top of your mattress to the bottom of the headboard’s decorative elements. This is crucial when considering wedge-shaped fillers that need to accommodate both horizontal and vertical space.
- Assess the Angle: Use a protractor or angle finder to measure the degree of curvature where the headboard meets the mattress. This helps when selecting or custom-cutting foam fillers to match the exact contour.
Special Considerations for Different Mattress Types
For pillow-top mattresses: Measure both compressed and uncompressed states, as the plush top may settle differently against the headboard. For adjustable bases: Take measurements in both flat and elevated positions, as gaps often change when the bed moves. For split mattresses: Measure each side independently, as frames may settle unevenly over time.
Recording Your Measurements
Create a measurement diagram noting:
- Widest and narrowest gap points
- Any asymmetries between left and right sides
- Variations between headboard and footboard gaps
- Obstructions like bolts or decorative elements
Advanced Solutions for Different Gap Sizes and Bed Configurations
Selecting the right gap-closing solution requires matching your specific measurements to the appropriate technique.
Technical Solutions Matrix
| Gap Size | Recommended Solution | Material Science Rationale | Expected Longevity |
|---|---|---|---|
| 0.5″-2″ | Memory foam wedges | Viscoelastic properties allow gradual conforming to curves without losing support | 3-5 years with proper care |
| 2″-4″ | Dual-density polyurethane foam fillers | Firmer base layer supports mattress weight while softer top conforms to bed curves | 5-7 years |
| 4″+ | Custom-cut high resilience foam with bed bridge system | 40-50 ILD foam provides structural integrity for larger spans without compression | 7-10 years |
Specialized Techniques for Unique Situations
For antique sleigh beds: Use archival-quality felt padding (3/8″ thick) between filler and wood to prevent finish damage while allowing for wood movement. The natural wool fibers breathe better than synthetic materials, protecting delicate finishes.
For adjustable bases: Install flexible silicone gap fillers that can stretch up to 200% of their original size when the bed articulates. These maintain seal integrity through various positions without tearing or separating.
Professional Installation Tips
- Temperature Considerations: Install foam fillers when room temperature is between 68-72°F – this allows materials to expand to their true dimensions before final positioning
- Compression Technique: For memory foam solutions, compress the filler 20% beyond the measured gap size to account for natural expansion over 48 hours
- Adhesive Selection: Use 3M Command strips for temporary solutions or high-bond spray adhesive (like 3M Super 77) for permanent installations
Common Installation Mistakes to Avoid
- Over-compression: Compressing foam more than 25% of its thickness causes premature breakdown of cell structure
- Improper curing: Allowing only 12 hours for adhesives to set when most require 24-48 hours for full bond strength
- Material mismatch: Using open-cell foam for structural gaps when closed-cell foam provides better long-term support
Professional Maintenance and Long-Term Care for Gap Solutions
Proper maintenance of your sleigh bed gap solution ensures lasting performance and preserves both your mattress and bed frame. Different materials require specific care routines based on their composition and structural properties.
Material-Specific Maintenance Schedules
| Material Type | Monthly Care | Quarterly Care | Annual Maintenance |
|---|---|---|---|
| Memory Foam | Vacuum with upholstery attachment | Spot clean with mild detergent | Air dry in sunlight for 2 hours |
| Polyurethane Foam | Rotate 180° to equalize wear | Check for compression lines | Apply foam protectant spray |
| Fabric-Covered | Lint roll surface | Steam clean at low temperature | Professional deep cleaning |
Advanced Preservation Techniques
For high-humidity environments: Apply a thin layer of talcum-free powder every 6 months to prevent moisture absorption in foam materials. Use a makeup brush for even distribution in hard-to-reach areas along the bed’s curves.
For pet owners: Install a removable, washable barrier fabric (like Crypton) between the gap filler and mattress. This protects against claws and accidents while maintaining breathability.
Troubleshooting Common Issues
- Filler Shifting: If your solution moves out of place, apply double-sided carpet tape to the bottom edge – the low-profile adhesive won’t damage surfaces but provides necessary grip
- Foam Breakdown: When memory foam loses more than 30% of its original thickness, rebuild the structure by placing it in direct sunlight for exactly 3 hours (UV radiation helps re-expand cells)
- Odor Retention: For stubborn smells in porous materials, use an ozone generator treatment (30-minute sessions at 500ppm) to break down odor molecules at the molecular level
Safety Considerations
- Fire Safety: Ensure all gap solutions meet CAL TB 117-2013 flammability standards, especially important for foam materials near electrical outlets
- Allergen Control: Hypoallergenic covers should have a pore size ≤6 microns to block dust mites and bed bugs
- Ventilation: Maintain at least 1/2″ air space between filler and wall to prevent moisture buildup and mold growth
Cost-Benefit Analysis and Long-Term Value of Gap Solutions
Choosing the right gap solution involves weighing initial costs against long-term performance and hidden expenses.
Comparative Cost Analysis Over 10 Years
| Solution Type | Initial Cost | Annual Maintenance | Replacement Cycle | Total 10-Year Cost | Mattress Protection Value |
|---|---|---|---|---|---|
| DIY Foam Insert | $25-$50 | $5 | 3 years | $110-$160 | Moderate |
| Premium Gap Filler System | $120-$200 | $10 | 7 years | $140-$220 | High |
| Custom Professional Solution | $300-$500 | $15 | 10+ years | $315-$515 | Excellent |
Hidden Cost Considerations
Mattress Wear Prevention: Proper gap solutions can extend mattress life by 2-3 years by preventing edge collapse (worth $300-$800 in delayed replacement costs for quality mattresses). Energy Efficiency: Well-sealed gaps improve thermal insulation, potentially reducing heating costs by 3-5% in colder climates.
Environmental Impact Assessment
- Material Sustainability: Natural latex fillers have 50% lower carbon footprint than polyurethane but cost 30-40% more initially
- End-of-Life Disposal: High-density foams may require special recycling (adds $15-$25 disposal fee) versus biodegradable wool fillers
- Health Considerations: CertiPUR-US certified foams eliminate 98% of VOC emissions compared to uncertified alternatives
Future Trends in Gap Solutions
- Smart Materials: Phase-change memory foams that automatically adjust to temperature fluctuations (projected 2025 availability)
- Integrated Systems: Sleigh beds with built-in adjustable gap mechanisms (currently in prototype stage)
- Self-Healing Fabrics: Microcapsule technology that repairs minor tears automatically (already in development)
Specialized Solutions for Unique Sleigh Bed Configurations
Standard gap solutions often fail to address the complex challenges posed by non-traditional sleigh bed designs.
Solutions for Complex Bed Designs
| Bed Type | Primary Challenge | Recommended Solution | Technical Specifications |
|---|---|---|---|
| Canopy Sleigh Beds | Vertical gap + side clearance | Multi-axis foam wedges | Dual-density foam (35ILD base/20ILD top), 45° angle cut |
| Waterfall Headboards | Continuous curved surface | Flexible silicone insert | Shore A40 hardness, 200% stretch capacity |
| Storage Footboards | Moving parts interference | Magnetic gap seal | Neodymium magnets (N52 grade), 5mm EVA backing |
Advanced Installation Techniques
- For Uneven Floors: Use laser level to identify slope, then compensate with tapered shims (1/8″ increments) beneath the low side before installing gap filler
- For Metal Framed Beds: Apply anti-vibration pads between filler and frame to prevent squeaking (3mm thick Sorbothane works best)
- For Upholstered Headboards: Install breathable spacer fabric (0.5cm mesh) between filler and fabric to prevent moisture buildup
Professional Integration Methods
- With Adjustable Bases: Programmable gap adjusters that sync with bed movement (requires 12V DC power connection)
- For Smart Beds: Pressure-sensitive gap fillers that alert via app when compression exceeds optimal levels
- In RV Applications: Collapsible foam systems that compress during travel but expand to full density when parked
Troubleshooting Complex Installations
When fillers won’t stay positioned: Use 3M VHB tape (1″ width) for permanent bonding to clean, dry surfaces. For temporary solutions, museum gel provides strong but removable hold. For noisy solutions: Apply felt friction tape (1/2″ width) along contact points to eliminate squeaks while maintaining movement.
Comprehensive Performance Optimization and Quality Assurance
Maximizing the effectiveness of your sleigh bed gap solution requires a systematic approach to performance monitoring and quality control.
Performance Benchmarking Framework
| Performance Metric | Measurement Method | Target Standard | Testing Frequency |
|---|---|---|---|
| Gap Closure Efficiency | Laser distance measurement at 5 points | ≤0.25″ variance across all points | Bi-annually |
| Material Compression | Digital caliper thickness test | ≤5% loss from original thickness | Quarterly |
| Structural Integrity | 20lb localized pressure test | ≤0.5″ depression with full recovery | Monthly |
Advanced Optimization Techniques
- Dynamic Load Testing: Simulate 10 years of use in 48 hours using cyclic compression equipment (1Hz frequency at 75% max load capacity)
- Thermal Cycling: Expose materials to temperature variations (50-90°F) to verify dimensional stability under seasonal changes
- Microclimate Monitoring: Install humidity sensors between mattress and filler to maintain ideal 45-55% RH range
Comprehensive Risk Mitigation
- Material Degradation: Implement UV-protective coatings (3M Scotchgard Fabric Protector) for sun-exposed locations
Bacterial Growth: Silver-ion infused fabric covers (tested to AATCC 100 standards)Monthly inspection with black lightStructural FatigueUltrasonic thickness testing≥90% original density maintainedAnnually
Long-Term Performance Strategies
For premium installations, consider these advanced preservation techniques:
- Climate-Controlled Sealing: Install microporous membrane barriers (ePTFE material) that allow vapor transmission while blocking dust and allergens
- Load Distribution Systems: Incorporate carbon fiber reinforcement strips in high-stress areas to prevent compression ridges
- Smart Monitoring: Embed flexible pressure sensors that alert when filler compression exceeds optimal levels
Quality Validation Protocol
Professional installers follow this 10-point verification checklist:
- 72-hour material acclimation period in installation environment
- Dimensional tolerance verification with laser alignment tools
- Compression recovery test after 24-hour break-in period
- Surface temperature differential check (≤2°F variance)
- Acoustic evaluation for movement-related noise
Final Thoughts: Achieving Perfect Sleigh Bed Harmony
Closing the gap between your sleigh bed and mattress requires understanding the unique challenges of curved headboards, precise measurement techniques, and selecting the right solution for your specific needs.
From DIY foam inserts to professional-grade gap filler systems, we’ve explored comprehensive methods to achieve a seamless fit that enhances both aesthetics and sleep quality. Remember that proper installation, regular maintenance, and quality materials make all the difference in long-term performance.
Take action today: Start by measuring your exact gap dimensions, then choose a solution that matches both your bed’s requirements and your personal preferences. Whether you opt for a simple temporary fix or invest in a custom permanent solution, addressing this common bedroom issue will transform your sleeping experience.
For optimal results, consider consulting with a sleep specialist or furniture expert to evaluate your particular setup.
Frequently Asked Questions About Closing the Gap Between Your Sleigh Bed and Mattress
What causes gaps between sleigh beds and mattresses?
Sleigh beds feature curved headboards and footboards that naturally create spaces where straight-edged mattresses can’t conform.
The primary causes include: the bed’s architectural design (especially dramatic curves), mattress thickness changes over time, manufacturing tolerances (even “matching” sets may vary by 1-2 inches), and frame elevation differences. These gaps typically appear most noticeably at the sides and top of the mattress where it meets the curved surfaces.
How do I measure the gap accurately for the right solution?
Use a flexible tape measure to record:
1) Horizontal distance at top, middle, and bottom of the curve (gaps often vary),
2) Vertical space from mattress top to headboard bottom, and
3) Angle of curvature using a protractor.
For accuracy, measure both sides as beds may settle unevenly. Record the largest measurement to ensure your solution fits the widest point.
What’s the best material for filling sleigh bed gaps?
High-density memory foam (4-5lb density) works best for most applications because it conforms to curves while maintaining support. For larger gaps (4+ inches), use dual-density polyurethane foam with a firm base layer.
Avoid cheap fiberfill or polyester batting – they compress quickly and require frequent replacement. Premium solutions use CertiPUR-US certified foams for durability and safety.
Can I use pool noodles or rolled towels as a temporary fix?
While pool noodles (split lengthwise) or tightly rolled towels can work temporarily, they’re not ideal long-term solutions. Pool noodles compress within weeks and towels retain moisture.
If using temporarily: wrap noodles in breathable fabric and replace every 2-3 months. For better temporary solutions, consider foam pipe insulation (1-2″ thickness) with adhesive backing.
How do I prevent my gap filler from sliding out of place?
For permanent solutions, use high-bond spray adhesive (3M Super 77) on clean, dry surfaces. For removable options:
1) Apply double-sided carpet tape to the bottom edge,
2) Use hook-and-loop strips (Velcro) along contact points, or
3) Install a fabric sleeve that wraps around the mattress edge.
For heavy fillers, consider L-shaped brackets screwed into the bed frame.
Will filling the gap affect my mattress warranty?
Most mattress warranties remain valid as long as:
1) The filler doesn’t compress the mattress edge more than 1 inch,
2) You use breathable materials that don’t trap moisture, and
3) You don’t modify the mattress itself.
Always check your specific warranty terms – premium brands like Tempur-Pedic and Stearns & Foster have explicit guidelines about gap fillers.
What’s the cost difference between DIY and professional solutions?
DIY foam solutions range $25-$75 (materials only), while custom professional installations cost $150-$400. The premium includes: precise laser measurements, custom-cut materials, professional installation, and often longer warranties (3-5 years vs 1 year for DIY). Mid-range options like pre-made foam wedges with custom covers run $80-$120.
How often should gap fillers be replaced or maintained?
High-quality foam fillers typically last: 3-5 years with basic care, 5-7 years with proper maintenance. Inspect annually for compression lines >0.5″ deep.
Rotate fillers 180° every 6 months to equalize wear. Clean with mild detergent every 3-4 months. Replace immediately if you notice: persistent odors, visible crumbling, or loss of >30% original thickness.