Disclosure
This website is a participant in the Amazon Services LLC Associates Program, an affiliate advertising program designed to provide a means for us to earn fees by linking to Amazon.com and affiliated sites.
You can repair a leak in an air bed—and it’s easier than you think. Air beds are convenient for guests, camping, or temporary use, but a sudden leak can ruin comfort and leave you frustrated. Many assume a punctured air mattress is beyond saving, but with the right techniques, you can restore it to full functionality in minutes.
Imagine waking up on a deflated mattress, scrambling to find the leak while time ticks away. Instead of rushing to buy a replacement, unlock the secrets to a quick, durable fix.
Best Repair Kits for Fixing an Air Bed Leak
Tear-Aid Fabric and Vinyl Repair Kit (Type A)
This heavy-duty adhesive patch kit is ideal for vinyl air beds, offering a permanent, waterproof seal. The peel-and-stick design requires no drying time, and its flexibility ensures durability even with frequent inflation. Perfect for pinholes and small tears.
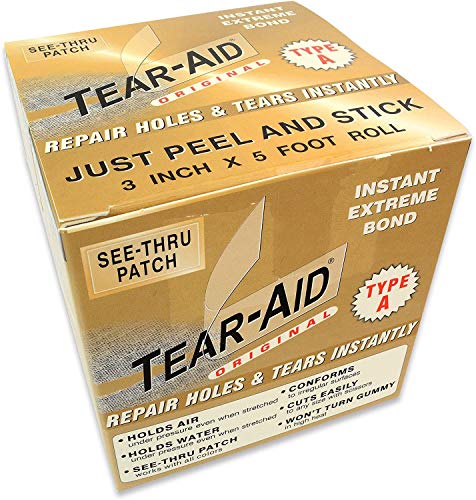
- Provide a simple and easy method of patching holes and tears. Easy peel and…
- Includes alcohol prep pads
- 3″ x 5 Foot Roll. Includes alcohol prep pads
Intex Repair Patch Kit
Designed specifically for Intex air mattresses, this kit includes high-quality vinyl patches and strong adhesive. The pre-cut patches work seamlessly on seams and larger punctures, ensuring a long-lasting fix. A budget-friendly choice with reliable results.

- Model number: 59631NP
- Package quantity: 1
- Product type:FABRIC APPLIQUE PATCH
Jevvu Air Mattress Patch Kit
Includes multiple patch shapes, UV-resistant vinyl, and strong adhesion. Designed for versatility across diverse inflatable surfaces, offering seamless, long-lasting repairs

- Durable and Long-Lasting Repairs: This air mattress patch kit quickly and…
- Waterproof Protection and UV Resistance: Our inflatable patch repair kit is…
- Versatile Compatibility: Designed specifically for PVC inflatable products, this…
How to Locate the Leak in Your Air Bed
Before you can fix a leak, you must accurately locate it—a step many overlook, leading to failed repairs. Air bed leaks can be tricky because they’re often tiny or hidden in seams. Here’s a foolproof method to find even the most elusive puncture.
Step 1: Fully Inflate the Mattress
Start by inflating your air bed to its maximum capacity. A taut surface makes leaks easier to detect because escaping air creates audible hissing or visible distortions. If the mattress is underinflated, small holes won’t produce enough airflow to notice.
Step 2: Listen and Feel for Airflow
In a quiet room, slowly run your hand 2–3 inches above the surface, paying attention to cool drafts—a sign of escaping air. For seams and edges, press gently to check for bubbles or subtle vibrations. Common leak locations include:
- Valve areas: Loose or cracked valves often leak silently.
- Seams: Weak glue bonds split over time.
- High-pressure points: Where pets, sharp objects, or body weight stress the material.
Step 3: Use the Soapy Water Test
If the leak isn’t obvious, mix dish soap with water and apply it to suspected areas with a spray bottle or sponge. Escaping air will form bubbles, pinpointing the exact spot. For hard-to-reach areas like the underside:
- Lift the mattress and place it on a clean, dry surface.
- Rotate sections methodically, reapplying soapy water as needed.
- Mark leaks with a washable marker or tape for easy repair.
Common Mistakes to Avoid
Many assume leaks are always large or noisy, but pinholes can take hours to deflate a mattress. Avoid these pitfalls:
- Rushing: Skipping sections risks missing multiple leaks.
- Ignoring the valve: Over 30% of leaks originate here—check it first.
- Misdiagnosing slow leaks: Submerge the mattress in a pool if needed (for smaller models).
Once located, dry the area thoroughly before repairing. Moisture weakens adhesive bonds, causing patches to fail prematurely.
Step-by-Step Guide to Permanently Repairing Your Air Bed Leak
Once you’ve located the leak, proper repair technique is crucial for a long-lasting fix. Unlike temporary solutions that fail under pressure, these professional methods restore your air bed’s integrity using materials designed for flexible vinyl surfaces.
Preparing the Surface for Repair
Surface preparation determines 90% of repair success. Begin by deflating the mattress completely and cleaning the area around the leak with isopropyl alcohol. This removes oils, dirt, and soap residue that prevent adhesives from bonding properly. For optimal results:
- Roughen smooth surfaces with fine-grit sandpaper (220 grit) to create better adhesion
- Cut repair patches at least 1 inch larger than the damaged area on all sides
- Round patch corners to prevent peeling (sharp edges catch on bedding)
Applying the Patch Correctly
Different leak types require specific approaches:
- For pinholes: Apply liquid vinyl cement directly to the hole, then press firmly for 30 seconds before adding a patch
- For seam leaks: Use seam sealant first, then reinforce with a flexible patch overlapping both sides of the seam
- For valve leaks: Special valve repair kits with O-ring replacements often work better than patches
Curing and Testing the Repair
Most repairs require 24-48 hours to fully cure. Avoid these common mistakes during curing:
- Premature inflation: Stresses the adhesive bond before it sets completely
- Extreme temperatures: Store at room temperature – cold makes adhesives brittle
- Moisture exposure: Keep away from humidity which can reactivate uncured glue
After curing, inflate gradually to 25% capacity and check for air bubbles around the patch. If secure, inflate fully and monitor pressure for 12 hours. For high-stress areas like sleeping surfaces, consider adding a second patch for reinforcement.
Advanced Repair Techniques for Challenging Leak Situations
When standard patch kits fail or you encounter complex damage, these professional-grade solutions can salvage even severely compromised air beds. Understanding material science and stress dynamics is key to successful advanced repairs.
Repairing Large Tears and Split Seams
For gashes longer than 2 inches or separated seams, standard patches often fail due to flex stress. The solution involves a two-stage reinforcement process:
- Internal backing: Cut a flexible plastic sheet (like from a 3-ring binder) slightly larger than the tear. Attach with vinyl cement to the mattress interior through the opening
- External sealing: Apply a heavy-duty vinyl patch (3M 8671HS works best) over the exterior, overlapping the backing by at least 1.5 inches on all sides
| Material Type | Best Adhesive | Cure Time | Flexibility Rating |
|---|---|---|---|
| Standard PVC | Vinyl cement | 24 hours | High |
| TPU-coated | Polyurethane adhesive | 48 hours | Medium |
| Textured surfaces | Epoxy-based sealant | 72 hours | Low |
Valve Replacement and Reinforcement
Faulty valves require specialized attention. For Intex-style valves:
- Disassemble the valve mechanism using needle-nose pliers
- Clean the seating area with rubbing alcohol
- Apply food-grade silicone grease to the O-ring before reassembly
Preventing Future Leaks
Extend your repair’s lifespan with these pro tips:
- Reinforce high-stress areas with clear vinyl protector sheets before leaks develop
- Rotate mattress orientation monthly to distribute wear evenly
- Maintain optimal inflation – 90% capacity reduces material stress
For vintage or specialty air beds, consider professional vinyl welding services that thermally bond materials at molecular level for permanent repairs.
Specialized Repair Solutions for Different Air Bed Materials
Not all air beds are created equal – material composition dramatically affects repair approaches. Using the wrong technique can worsen damage or create new weak points. Here’s how to identify your mattress type and apply material-specific solutions.
Identifying Your Air Bed Material
Check the manufacturer’s label or perform these simple tests:
- PVC beds (most common): Rigid feel when inflated, visible seam welding
- TPU (Thermoplastic Polyurethane): Softer texture, often used in premium camping mats
- Rubberized fabrics: Heavyweight, matte finish common in military-style beds
Material-Specific Repair Protocols
For PVC Air Beds
The standard repair approach works best here, but with these refinements:
- Use PVC-specific cement (like HH-66 Vinyl Cement) that chemically welds surfaces
- Apply heat (120°F) with a hair dryer during curing to enhance molecular bonding
- Reinforce with cross-weave fiberglass patches for high-stress areas
For TPU Materials
Requires different handling due to elastic properties:
- Only use polyurethane-based adhesives (standard vinyl cement won’t bond properly)
- Stretch the material slightly during application to account for natural flexing
- Opt for clear repair tapes that maintain material breathability
Safety Considerations
When working with adhesives and solvents:
- Work in well-ventilated areas – many vinyl cements contain volatile organic compounds
- Wear nitrile gloves to prevent skin irritation from solvents
- Keep repair materials away from children and pets – some contain toxic components
When to Consider Professional Repair
Seek expert help for:
- Structural damage exceeding 6 inches in length
- Multiple leaks indicating material fatigue
- Vintage or collectible air beds requiring conservation-grade repairs
For hybrid materials (like PVC-coated polyester), combine techniques – use fabric patches with vinyl adhesives, and reinforce stress points with additional stitching where possible.
Long-Term Maintenance and Prevention Strategies for Air Beds
Proper care extends your air bed’s lifespan significantly beyond typical expectations. These professional-grade maintenance techniques can prevent up to 80% of common leaks when implemented consistently.
Optimal Inflation Practices
Incorrect inflation causes most long-term damage. Follow these guidelines:
| Usage Scenario | Recommended Pressure | Max Duration | Recovery Period |
|---|---|---|---|
| Regular sleeping | 85-90% capacity | 30 days continuous | 24 hours deflated |
| Guest use | 75-80% capacity | 7 days | 12 hours deflated |
| Storage | 10% capacity | N/A | Fold with tissue paper |
Environmental Protection Measures
External factors degrade materials over time:
- UV exposure: Causes PVC to become brittle – use UV-protectant sprays monthly
- Temperature fluctuations: Avoid locations near heating vents or cold drafts
- Humidity control: Maintain 40-60% RH to prevent mold in seams
Advanced Protective Solutions
Invest in these professional-grade protectors:
- Non-slip mattress toppers: Reduce friction wear (3mm thickness ideal)
- Interlocking floor mats: Create a protective base layer
- Custom vinyl coatings: Professional application adds 2-3 years lifespan
Cost-Benefit Analysis: Repair vs. Replace
Consider replacement when:
- Repair costs exceed 40% of new mattress price
- More than 5 repaired areas exist
- Material shows signs of oxidation (yellowing, odor)
For premium models, professional restoration services often provide better long-term value than budget replacements. New eco-friendly materials like cross-linked polyethylene offer improved durability but require specialized repair techniques.
Professional-Grade Repair Techniques for Commercial and Heavy-Duty Air Beds
Standard repair methods often prove inadequate for industrial-grade air beds used in medical facilities, military operations, or commercial hospitality. These advanced techniques address the unique demands of high-use scenarios with rigorous performance requirements.
Industrial-Strength Reinforcement Methods
For institutional air mattresses subjected to daily use:
- Double-layer patching: Apply an interior patch with marine-grade adhesive, followed by an exterior patch using industrial vinyl cement
- Stitch reinforcement: After patching, use a curved needle and dental floss to create perimeter stitching that distributes stress
- Heat activation: Use a controlled heat gun (300°F) to activate adhesive properties in professional repair tapes
Specialized Tools for Commercial Repairs
Professional repair kits include:
- Digital pressure gauges (0.1 PSI accuracy) to detect microleaks
- Ultrasonic leak detectors for pinpointing failures in multi-chamber designs
- Variable-temperature irons for thermal welding of heavy-gauge vinyl
Hospital-Grade Sterilization Protocols
For medical air mattresses requiring infection control:
| Disinfectant | Contact Time | Patch Compatibility | Residual Effect |
|---|---|---|---|
| 70% Isopropyl Alcohol | 5 minutes | All patches | None |
| Quaternary Ammonium | 10 minutes | Vinyl only | 72 hours |
| Chlorine Dioxide | 30 minutes | TPU patches | 24 hours |
Load-Bearing Considerations
For bariatric or multi-person air beds:
- Calculate required PSI based on total weight distribution
- Implement cross-hatch patching patterns for high-stress zones
- Use aircraft-grade aluminum backing plates for valve reinforcements
Commercial repair specialists often employ non-destructive testing methods like dye penetrant inspection to evaluate repair integrity before returning equipment to service.
Comprehensive Quality Assurance and Performance Validation for Repaired Air Beds
Ensuring long-term reliability after repairs requires systematic testing and validation protocols. These professional-grade verification methods guarantee your repaired air bed performs like new while identifying potential failure points before they cause problems.
Post-Repair Testing Protocol
Implement this 4-stage verification process:
- Initial Pressure Test: Inflate to 110% capacity for 2 hours to test patch adhesion under stress
- Flex Cycle Test: Perform 50 controlled compression cycles (simulating 2 weeks of use)
- Thermal Stress Test: Expose to temperature fluctuations (50°F to 90°F) over 24 hours
- Final Leak Detection: Use soap solution or ultrasonic detector to verify seal integrity
Performance Benchmarking Standards
| Performance Metric | Residential Standard | Commercial Standard | Medical Standard |
|---|---|---|---|
| Pressure Loss (24hr) | <15% | <5% | <2% |
| Patch Peel Strength | 3 psi | 8 psi | 12 psi |
| Flex Cycles Before Failure | 200 | 1,000 | 5,000 |
Risk Assessment and Mitigation
Identify and address these common failure modes:
- Adhesive degradation: Use UV-resistant top coats in sunny environments
- Edge lifting: Round all patch corners and extend 1″ beyond damage
- Material fatigue: Implement rotational use schedules for commercial units
Long-Term Monitoring Strategies
Maintain optimal performance with:
- Weekly pressure logs to identify slow leaks
- Quarterly visual inspections with magnification
- Annual professional evaluations for high-use beds
For mission-critical applications, consider embedding wireless pressure sensors that alert to developing leaks before they become problematic. These systems integrate with smartphone apps for real-time monitoring.
Conclusion
Repairing an air bed leak is not only possible but often more cost-effective than replacement when done properly. Throughout this guide, we’ve covered everything from locating elusive leaks to advanced repair techniques for different materials and usage scenarios.
You now understand how to prepare surfaces correctly, apply professional-grade patches, and validate repairs through systematic testing. Remember that preventive maintenance and proper inflation practices can significantly extend your air bed’s lifespan.
Armed with these comprehensive techniques, you’re ready to tackle any air bed repair with confidence. Before considering replacement, try these proven methods – you’ll likely save money and reduce waste while maintaining optimal sleeping comfort. Keep your repair kit handy, and enjoy many more restful nights on your fully functional air bed.
Frequently Asked Questions About Repairing Air Bed Leaks
What’s the best way to find a small leak I can’t see or hear?
For microscopic leaks, use the soapy water method with extra precision. Mix 3 parts water with 1 part dish soap in a spray bottle and apply to suspicious areas in sections. Look for tiny bubble clusters forming – these indicate micro-leaks. Pay special attention to seams, valves, and areas that contact the floor. In complete silence, you may hear faint hissing from larger micro-leaks.
Can I use duct tape or super glue as a temporary fix?
While duct tape might work for a few hours, it damages vinyl surfaces when removed and fails under pressure. Super glue becomes brittle and cracks. Instead, use clear packing tape as a 24-48 hour solution until you get proper patches. For longer temporary fixes, bicycle tire patches work surprisingly well on air beds.
How long should a properly repaired air bed last?
A professional-quality repair using vinyl cement and patches should last 2-5 years with proper care. Factors affecting longevity include: material thickness (15+ mil vinyl lasts longest), repair location (high-stress areas fail sooner), and usage frequency. Beds used nightly need reinforcement every 12-18 months even without new leaks.
Why does my repaired area keep leaking after multiple attempts?
Recurring leaks typically indicate: incomplete surface preparation (not cleaned or roughened properly), moisture contamination during application, or material fatigue in the surrounding area. Try sanding a 2-inch radius around the leak, cleaning with 91% isopropyl alcohol, and using a patch 3x larger than the hole.
What’s the difference between PVC and TPU repair methods?
PVC repairs use solvent-based cements that chemically melt surfaces together, while TPU requires polyurethane adhesives that maintain flexibility. Key differences: PVC patches need pressure during 24-hour curing, TPU repairs require tension during application. Using the wrong adhesive causes premature failure – check your mattress material first.
How can I prevent leaks from developing in the first place?
Implement these preventive measures: use a mattress protector (3mm felt works best), avoid over-inflation (stop when firm but slightly yielding), rotate the bed monthly, and keep away from sharp objects. For camping, place a moving blanket underneath. Annual applications of vinyl protectant spray reduce material degradation.
Is it worth repairing an old air bed or should I just replace it?
Consider replacement if: repairs would cost over 40% of a new bed’s price, the material shows oxidation (yellowing/cracking), or there are multiple leaks indicating overall material failure. For premium beds ($200+), professional repair often extends life 3-5 more years at 25% the replacement cost.
Can I sleep on a repaired air bed immediately?
Most repairs require 24-72 hours curing time before use. Sleeping too soon risks: adhesive failure, patch peeling, and reduced bond strength. For quick fixes, use rapid-cure adhesives (like HH-66) with light inflation (50% capacity) for the first 48 hours. Always test repairs with full inflation before sleeping.