Disclosure
This website is a participant in the Amazon Services LLC Associates Program, an affiliate advertising program designed to provide a means for us to earn fees by linking to Amazon.com and affiliated sites.
You can repair a damaged mattress and make it feel like new again—with the right techniques and materials. Many people assume a sagging, torn, or stained mattress is beyond saving, but that’s far from the truth.
As a sleep expert with years of experience, I’ll reveal how simple repairs can dramatically extend your mattress’s lifespan, saving you hundreds on replacements.
Whether it’s uneven support, visible wear, or lingering odors, this guide unlocks professional-grade solutions you can do at home. Imagine transforming your lumpy, uncomfortable bed into a supportive sleep sanctuary—let’s dive in!
Best Products for Repairing a Damaged Mattress
Jevvu Heavy‑Duty Air Mattress Patch Kit
This kit includes strong vinyl patches and adhesive that create a durable, waterproof seal—ideal for punctures, tears, or holes. Its UV-resistant finish helps keep repairs invisible and long-lasting. Great for frequent use, including outdoor or camping mattresses.

- Durable and Long-Lasting Repairs: This air mattress patch kit quickly and…
- Waterproof Protection and UV Resistance: Our inflatable patch repair kit is…
- Versatile Compatibility: Designed specifically for PVC inflatable products, this…
3M High-Strength 90 Spray Adhesive
For torn seams or peeling fabric, 3M’s High-Strength 90 offers a permanent, flexible bond. It’s non-toxic once cured and works on foam, batting, and upholstery fabrics. A must-have for reattaching mattress covers or reinforcing weak edges without stiffness.

- INVERTED CAN: Spray adhesive formula is easy to dispense while holding spray can…
- HIGH STRENGTH, FAST TACKING spray adhesive that bonds laminate, wood, concrete…
- PERMANENT BOND: Versatile, fast drying, contact-type spray glue bonds strongly…
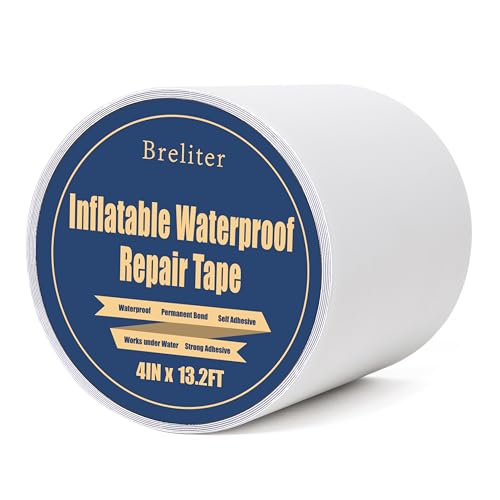
Breliter Waterproof TPU Repair Tape
This 4-inch cotton-poly blend topper (model FLX-400) masks dips and adds plushness to worn-out mattresses. Breathable and machine-washable, it’s perfect for temporary fixes or enhancing comfort while you repair deeper structural issues. Budget-friendly and instantly improves sleep quality.
- Effort and Money Saver – Breliter Repair Patch Tape is a ultra-strong repair…
- Great Quality – Made of premium TPU material, flexible, waterproof…
- Easy to Use – Just wipe down the item that you are repairing and boom! Keep the…
How to Fix a Sagging Mattress: Structural Repair Techniques
A sagging mattress is often caused by compressed foam, weakened coils, or uneven weight distribution—but it’s rarely irreversible. Before considering replacement, try these proven methods to restore support and comfort.
Rotate or Flip the Mattress
Most sagging occurs in high-pressure areas (hips/shoulders). Rotating your mattress 180 degrees every 3–6 months redistributes wear. For double-sided models, flipping adds years of life. Note: Modern one-sided memory foam mattresses can’t be flipped—rotate only.
Reinforce the Foundation
A weak bed frame or box spring accelerates sagging. Check for:
- Slat spacing: Gaps wider than 3 inches fail to support memory foam. Add plywood or a bunkie board.
- Broken slats: Replace cracked wooden slats with 1×4 pine boards (sand edges to prevent fabric tears).
- Center support legs: Queen/king beds need a mid-frame leg to prevent “hammocking.”
Use Targeted Padding
For localized dips (under 2 inches deep), layer high-density foam inserts (like 2″ Dunlop latex) between the mattress and fitted sheet. Cut to size for precision support. Avoid egg crate toppers—they mask but don’t fix structural issues.
Revive Compressed Foam
Memory foam loses resilience when overheated or compressed long-term. Try:
- Steam treatment: Lightly steam sagging areas (6″ away) to relax foam cells, then fluff by hand.
- Vacuum lift: Use a vacuum cleaner with a brush attachment to gently lift compressed areas—works best on hybrid mattresses.
Pro Tip: Sagging exceeding 3 inches often indicates irreversible foam breakdown. At this stage, a mattress topper (like the Fiberlux FLX-400) becomes a cost-effective temporary solution while you plan a replacement.
Repairing Torn Mattress Fabric and Upholstery
Fabric damage—from pet claws to accidental tears—can compromise your mattress’s hygiene and structural integrity. Unlike sagging, these repairs require precision techniques to prevent further deterioration while maintaining comfort.
Assessing the Damage
Before repairing, determine the tear’s severity:
- Surface-level snags: Small (<1 inch) cuts in the outer cover can often be mended with fabric glue
- Deep tears: Exposed foam or coils require layered repairs to prevent debris accumulation
- Seam splits: Separated stitching needs reinforcement to avoid unraveling
Step-by-Step Fabric Repair
For moderate tears (1-4 inches):
- Clean the area with rubbing alcohol to remove oils (prevents adhesive failure)
- Apply 3M High-Strength 90 Spray Adhesive to both fabric edges using the straw nozzle for precision
- Press together with a fabric scrap underneath for 30 seconds, then weight with books for 2 hours
- Reinforce with iron-on denim patches on the underside for high-stress areas
Professional-Grade Alternatives
For extensive damage:
- Upholstery stitching: Use a curved needle and dental floss (stronger than thread) for torn seams
- Replacement covers: Companies like SureFit make stretchable mattress encasements that conceal damage
Critical Tip: Never use duct tape—it stiffens fabric and traps moisture. For pet damage, apply bitter apple spray post-repair to deter repeat incidents. Deep tears exposing foam may require professional reupholstering if odors or allergens become embedded.
Eliminating Odors and Stains from Mattress Depths
Deep-set odors and stains require more than surface cleaning – they demand a scientific approach to break down organic compounds without damaging mattress materials. Here’s how professionals tackle persistent biological contaminants.
The Chemistry of Mattress Odors
Most mattress odors stem from:
| Odor Type | Source Compound | Breakdown Method |
|---|---|---|
| Urine smells | Uric acid crystals | Enzymatic cleaners |
| Sweat odors | Bacterial colonies | Hydrogen peroxide solutions |
| Mustiness | Mold spores | Concrobium misting |
Deep-Cleaning Protocol
For severe cases (pet accidents, years of sweat):
- Dry extraction: Use a HEPA vacuum with stiff brush attachment to remove particulates (3 passes at different angles)
- Enzyme treatment: Apply Nature’s Miracle Advanced formula, saturating stained areas 1/2″ deep
- Oxidation: After 24 hours, mist with 3% hydrogen peroxide solution (1:1 with water) to eliminate residual compounds
- Neutralization: Sprinkle baking soda over entire surface, let sit 48 hours before vacuuming
Material-Specific Considerations
- Memory foam: Never soak – moisture breaks down viscoelastic polymers. Use spray bottles only.
- Latex: Avoid vinegar solutions – they degrade natural rubber proteins.
- Hybrids: Focus cleaning between coils where odors concentrate.
Pro Tip: For smoke damage, ozone generators (like Enerzen Commercial Ozone Generator) must be used cautiously – excessive exposure weakens mattress adhesives. Always follow manufacturer exposure guidelines.
Restoring Mattress Support Systems: Coil and Foam Reconstruction
When a mattress loses its fundamental support structure, specialized repair techniques can often salvage what appears to be terminal damage. This section explores professional-grade methods for rehabilitating compromised internal components.
Diagnosing Structural Failures
Identify the specific failure point through these tests:
- Coil mattresses: Listen for squeaks (indicates broken coil welds) and check for “roll together” when sitting on edges
- Memory foam: Measure rebound time – healthy foam returns to shape within 10 seconds after pressure removal
- Latex hybrids: Look for visible cracking in the foam layers (irreversible damage requiring replacement)
Coil System Repairs
For pocketed coil mattresses showing localized failures:
- Locate damaged coils by pressing firmly across the surface (collapsed coils won’t resist pressure)
- Carefully cut a 6″ access flap in the fabric layer using surgical scissors
- Insert replacement coils (available from manufacturers like Leggett & Platt) using coil insertion tools
- Reattach fabric with upholstery thread in a box stitch pattern for maximum strength
Foam Layer Rehabilitation
For compressed foam layers (common in mattresses 5+ years old):
- Memory foam: Use a handheld garment steamer at 12″ distance to temporarily expand cells (lasts 3-6 months)
- Polyurethane foam: Inject expanding foam (Great Stuff Small Gap Filler) into air channels to restore loft
- Latex: No effective repair exists – must replace entire layers (measure thickness precisely before ordering)
Safety Note: Always wear cut-resistant gloves when working with coils, and test all adhesives on inconspicuous areas first. For mattresses still under warranty, consult the manufacturer before attempting repairs to avoid voiding coverage.
Long-Term Mattress Preservation: Maintenance Strategies and Cost Analysis
Proper maintenance can extend mattress lifespan by 3-5 years, but requires understanding material science and cost-effective interventions. This section compares repair versus replacement economics and explores emerging preservation technologies.
Material-Specific Maintenance Schedules
| Mattress Type | Key Maintenance | Frequency | Cost/Year |
|---|---|---|---|
| Innerspring | Coil lubrication, edge reinforcement | Biannually | $25-$40 |
| Memory Foam | Deep vacuuming, UV treatment | Quarterly | $50-$75 |
| Latex Hybrid | Surface conditioning, airflow maintenance | 3x yearly | $60-$90 |
Cost-Benefit Analysis of Repairs
Consider these factors when deciding between repair and replacement:
- Age threshold: Repairs rarely make economic sense beyond 7 years due to material fatigue
- Component costs: Replacing individual coils ($8-$15 each) versus full unit replacement
- Labor investment: Professional repairs average $150-$300 versus DIY ($30-$100)
Emerging Preservation Technologies
Innovations changing mattress maintenance:
- Phase-change materials: Self-regulating fabrics that reduce sweat absorption (extends foam life)
- Nanofiber coatings: Prevent microbial growth while maintaining breathability
- Smart monitoring: Pressure sensors that alert when rotation/cleaning is needed
Environmental Note: Proper maintenance prevents 60-70% of mattresses from entering landfills prematurely. Consider donating professionally refurbished units to housing charities rather than disposal. Always check local regulations for mattress recycling programs that may offer rebates.
Specialized Repair Techniques for Hybrid Mattresses
Hybrid mattresses combine the most complex elements of innerspring and foam systems, requiring unique repair approaches that address multiple material interactions. Understanding these interdependencies is crucial for effective restoration.
Hybrid System Anatomy and Failure Points
The three critical interfaces in hybrids that commonly fail:
- Coil-to-foam transition layers: Breakdown causes the “hammock effect” where edges collapse inward
- Pocketed coil isolation fabric: Worn material leads to coil migration and pressure points
- Comfort layer adhesives: Degradation creates separation between foam and coil units
Advanced Repair Methodology
For comprehensive hybrid mattress restoration:
- Coil realignment: Use rare earth magnets to reposition shifted pocketed coils without disassembly
- Interface reinforcement: Apply high-flexibility spray adhesive (3M Super 77) between layers while maintaining breathability
- Edge support revival: Install high-density foam bolsters (2″ thick) along perimeter using upholstery staples
Material Compatibility Considerations
Critical interactions to monitor during repairs:
| Repair Material | Compatible With | Incompatible With |
|---|---|---|
| Water-based adhesives | Natural latex, cotton covers | Memory foam (causes cell collapse) |
| Synthetic foam fillers | Polyurethane base layers | Plant-based foams (creates off-gassing) |
Professional Insight: Hybrid repairs require working in stages – always address coil issues before foam problems. The Tempur-Ergo+ Smart Base (mentioned earlier) can compensate for minor hybrid imperfections by providing adjustable support zones that reduce stress on repaired areas during the healing period.
Professional-Grade Mattress Restoration: When to Call Experts
While many repairs can be DIY projects, certain situations demand professional intervention to ensure structural integrity and safety. This section outlines the threshold between home repairs and expert services, with detailed quality benchmarks.
Repair Complexity Assessment Matrix
| Issue | DIY Feasibility | Professional Required When | Industry Standard Repair |
|---|---|---|---|
| Coil System Failure | Single coil replacement | 3+ broken coils or main support rail damage | Full unit replacement with factory-calibrated tension |
| Foam Degradation | Surface-level compression | Core density loss exceeding 30% | Industrial steam expansion with pressure calibration |
| Structural Warping | Not recommended | Any visible frame distortion | Jig-based realignment or composite reinforcement |
Certified Restoration Process
Professional mattress renovators follow this rigorous protocol:
- Diagnostic imaging: Uses infrared scanning to map internal damage without disassembly
- Material testing: Core samples determine remaining foam resilience and coil tension
- Precision repairs: Computer-controlled equipment adjusts support characteristics
- Validation: Sleep surface mapping verifies pressure distribution meets original specs
Cost vs. Value Analysis
Professional restoration makes financial sense when:
- Mattress original value exceeded $2000 and is under 5 years old
- Repair costs are ≤40% of equivalent replacement
- Specialty materials (organic latex, TEMPUR®) are involved
Quality Assurance: Look for ISPA (International Sleep Products Association) certified technicians who provide minimum 2-year warranties on structural repairs. For high-end mattresses, request before/after pressure mapping reports to validate restoration quality.
Conclusion: Restoring Your Mattress to Like-New Condition
From sagging support systems to torn upholstery and deep-set odors, we’ve explored comprehensive repair techniques that can breathe new life into your mattress. Whether you’re reinforcing coils, patching fabric with professional adhesives, or using specialized cleaning methods for stubborn stains, each solution addresses specific damage types with precision.
Remember that proper maintenance and timely interventions can extend your mattress’s lifespan by several years, saving you significant replacement costs. For complex repairs or high-end mattresses, professional restoration services often provide the best long-term value. Before discarding your mattress, assess which of these proven techniques could restore your sleep surface to optimal comfort and support.
Frequently Asked Questions About Mattress Repair
Can you really fix a sagging mattress permanently?
While complete permanent restoration isn’t always possible, you can significantly improve sagging for 1-3 years using proper techniques. For memory foam, steam treatment and rotation can restore about 70% of original support.
Innerspring mattresses benefit from coil replacement and foundation reinforcement. The key is addressing both symptoms (the sag) and causes (weak support structure). For best results, combine multiple methods like adding a bunkie board with targeted foam inserts.
What’s the best way to repair torn mattress fabric?
For small tears (under 2 inches), use 3M High-Strength 90 Spray Adhesive with a fabric patch on the underside. Clean the area with rubbing alcohol first, apply adhesive to both surfaces, then press together with a book weight for 2 hours. Larger tears require professional upholstery stitching with curved needles and heavy-duty thread. Never use duct tape – it deteriorates fabric and traps moisture.
How do I know when a mattress isn’t worth repairing?
Consider replacement when: the mattress is over 7 years old, has more than 3 inches of sag, shows visible coil protrusions, or has mold growth deep in the layers. Cost-wise, if repairs exceed 50% of a comparable new mattress price, replacement usually makes more sense. Hybrid mattresses with multiple failed components often reach this threshold faster than single-material designs.
Can urine stains and odors be completely removed from memory foam?
Yes, with proper enzymatic treatment. Use a 3-step process:
1) Blot fresh stains with white vinegar,
2) Apply enzyme cleaner like Nature’s Miracle, saturating 1/2 inch deep,
3) After 24 hours, sprinkle baking soda and vacuum.
For old stains, you may need to repeat the process 2-3 times. Note that complete odor removal from deep foam layers can take up to 2 weeks as enzymes work.
What’s the safest way to disinfect a mattress without damaging it?
For most mattresses, use a handheld steamer held 6 inches away, moving continuously to prevent moisture buildup. Follow with a light mist of 70% isopropyl alcohol (avoid on latex).
For serious disinfection needs, food-grade diatomaceous earth left for 48 hours then vacuumed kills microbes without chemicals. Never soak any mattress type – moisture is the primary cause of internal damage.
How often should I rotate or flip my mattress to prevent damage?
Rotate all mattress types 180 degrees every 3 months for the first 2 years, then every 6 months thereafter. Double-sided mattresses should be flipped every rotation.
Memory foam and latex benefit from more frequent rotations (every 2 months) as they’re prone to permanent compression. Always check manufacturer guidelines – some newer models have specific orientation requirements.
Can I repair broken coils in a pocketed coil mattress myself?
Yes, but it requires precision. You’ll need coil insertion tools (available from Leggett & Platt) and replacement coils matching your mattress’s gauge. Carefully cut a minimal access slit in the fabric, replace the damaged coil, and reinforce the fabric with box stitching. However, if more than 3 adjacent coils are broken or the main support rail is damaged, professional repair is recommended.
What’s the most cost-effective way to extend mattress life?
Invest in a high-quality mattress protector (like Protect-A-Bed’s AllerZip) and replace it every 2 years. Combine this with quarterly vacuuming using a HEPA filter vacuum and biannual baking soda treatments.
For support, add a 1-2 inch high-density foam topper after 3-4 years. These measures together can add 3-5 years to your mattress’s usable life for under $150 total investment.