Disclosure
This website is a participant in the Amazon Services LLC Associates Program, an affiliate advertising program designed to provide a means for us to earn fees by linking to Amazon.com and affiliated sites.
You can attach a headboard to an adjustable bed frame—but it requires the right approach. Many assume adjustable beds and headboards are incompatible due to their unique mechanics, but with proper hardware and techniques, you can achieve both functionality and style.
As adjustable beds surge in popularity for their ergonomic benefits, homeowners crave solutions that don’t sacrifice aesthetics. Imagine waking up to a luxurious, cohesive bedroom setup where your headboard stays firmly in place, even as your bed adjusts to your ideal position.
Best Headboard Mounting Kits for Adjustable Bed Frames
Heavy Duty Headboard Bracket Kit, Universal Bed Frame
These universal steel brackets are designed specifically for adjustable bases, offering reinforced support for headboards up to 150 lbs. The tool-free installation and 6-inch height adjustability make them ideal for matching different bed frame heights. Durable powder-coated finish prevents scratches.
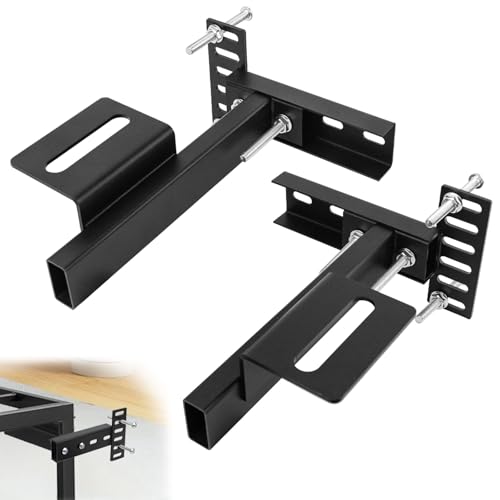
- 【Rock Solid Stability】 Who wants a headboard doing the salsa at 2am? Our…
- 【Install Without Tears】 Bolt it, forget it. Even your neighbor Bob (who…
- 【Silent Nights】 Tired of midnight squeak symphonies? Fixed contact plate…
Headboard Brackets for Metal Bed Frame
Compatible with most adjustable bed brands, this kit includes heavy-duty L-brackets, bolts, and spacers. The pre-drilled holes accommodate curved or flat headboards, while the zinc-plated hardware resists rust. Perfect for DIYers needing a no-wobble solution with clear instructions.

- Universal Compatibility: Designed to fit Twin, Full, Queen, and King size beds…
- Secure & Sturdy Construction: Built with heavy duty steel, these brackets offer…
- Complete Installation Kit: Includes two footboard extension brackets, two…
Leggett & Platt Prodigy 2.0 Headboard Adapter
A premium choice for high-end adjustable bases, this adapter features a low-profile design and rubberized grips to prevent slippage. Works seamlessly with split-headboard designs and includes tamper-proof screws for added stability during bed articulation.

- PILLOW TILT Position your head to the perfect degree for ultimate support while…
- HEAD AND FOOT ARTICULATION Effortlessly raise the head or foot to find your…
- CUSTOM PROGRAMMABLE POSITIONS Find personalized comfort by storing one of your…
Adjustable Bed Frame Compatibility with Headboards
Attaching a headboard to an adjustable bed frame isn’t as straightforward as with traditional beds due to their unique mechanics. Unlike stationary frames, adjustable bases move at multiple pivot points, requiring specialized mounting solutions that accommodate movement without compromising stability.
The key challenge lies in finding a secure attachment method that won’t interfere with the bed’s articulation or cause stress fractures in the headboard over time.
Why Standard Headboard Brackets Often Fail
Most conventional headboard brackets assume a static bed frame, making them incompatible with adjustable bases. Three critical issues arise:
- Insufficient clearance: Adjustable beds lift at angles up to 60 degrees, requiring brackets with extended reach or flexible joints to prevent headboard separation.
- Vibration stress: Motorized adjustments create micro-movements that can loosen standard screws. Solutions like rubberized washers or locking nuts are essential.
- Weight distribution: Upholstered headboards shift center of gravity during articulation. Reinforced steel brackets (like those in the Sleep Revolution SR-HB01) distribute weight evenly.
Key Compatibility Factors to Evaluate
Before purchasing hardware, assess these technical specifications:
- Mounting style: Some adjustable frames (e.g., Leggett & Platt models) use vertical rails, while others (like Tempur-Pedic) require side-mounted brackets. Check your frame’s manual for “headboard attachment points.”
- Material thickness: Measure your headboard’s mounting area. Thinner materials (under 1.5″) may need reinforcement plates to prevent tear-out during adjustments.
- Clearance gap: Leave at least 2″ between the headboard and wall to account for the bed’s raised position. The Zinus ZM-HBK01 kit includes spacers for this purpose.
Pro Tip: For split king adjustable beds, ensure your headboard adapter (like the Leggett & Platt 300045) has dual mounting points. Single-center brackets can cause uneven pressure when one side elevates independently.
Misalignment is the most common installation mistake. Always test the bed’s full range of motion before final tightening to confirm the headboard doesn’t collide with walls or nightstands in elevated positions.
Step-by-Step Guide to Securing Your Headboard to an Adjustable Frame
Proper installation requires careful preparation and execution to ensure long-term stability. Follow this professional-grade process to attach your headboard safely while preserving your adjustable bed’s full functionality.
Essential Tools and Preparation
Gather these specialized tools before beginning:
- Torque-adjustable drill (set to 8-10 Nm) to prevent overtightening sensitive components
- Rubber mallet for gently tapping brackets into position without damaging finishes
- Laser level (or 48″ bubble level) to ensure perfect alignment across the bed’s articulation points
Clear a 6-foot workspace around the bed and place moving blankets under the frame to protect flooring during adjustments. Remove any existing mounting hardware from both the headboard and frame.
Installation Process with Precision Adjustments
- Position the mounting brackets using the frame manufacturer’s specified attachment points (typically 16-24″ apart). For heavy headboards (>75 lbs), add a third center bracket.
- Insert vibration-dampening washers between all metal contact points. The Leggett & Platt kit includes proprietary rubber grommets that reduce noise during movement.
- Hand-tighten all bolts initially, leaving 1/4 turn loose. This allows for micro-adjustments during the alignment check.
Critical Testing Phase
After initial installation:
- Test all articulation positions (zero-gravity, TV, and flat) while observing the headboard connection
- Check for three specific issues: visible gap changes (>1/8″), creaking sounds, or resistance in movement
- Make incremental adjustments to bracket angles using shims if needed – plastic automotive shims work best for fine-tuning
Professional Insight: For split-king configurations, test each side independently. The headboard should remain stable when one side elevates to maximum position while the other stays flat. This prevents stress fractures in wooden headboards over time.
Final torque all bolts to manufacturer specifications (usually 12-15 ft-lbs) using a click-type torque wrench. Over-tightening can strip adjustable frame threads, while under-tightening leads to gradual loosening.
Advanced Solutions for Challenging Headboard Configurations
Some headboard and adjustable bed combinations require specialized solutions beyond standard mounting kits. These scenarios demand careful engineering considerations to maintain both aesthetics and functionality.
Custom Fabrication for Non-Standard Setups
When dealing with these unique situations, consider:
| Challenge | Solution | Technical Specification |
|---|---|---|
| Oversized headboards (width >80″) | Add intermediate support brackets every 24″ | Use 12-gauge steel L-brackets with 3/8″ lag bolts |
| Stone/marble headboards | Install hidden aluminum reinforcement channels | 1/4″ thick channels epoxied to backside with 6mm anchor points |
| Antique headboards with delicate carvings | Create custom mounting blocks that distribute pressure | Hardwood blocks sized to contact at least 3 structural points |
The Physics of Secure Attachment
Understanding these mechanical principles ensures proper installation:
- Shear force calculations: When elevated to 60°, a 50lb headboard generates approximately 43.3lbs of lateral force on brackets
- Moment arm considerations: The further the headboard protrudes from the mounting point, the greater the torque on connections
- Vibration harmonics: Motorized adjustments create 3-5Hz vibrations that can loosen connections over time
Professional Reinforcement Techniques
For maximum stability in demanding applications:
- Apply thread-locking compound (blue Loctite 242 recommended) to all bolt threads
- Install vibration-isolating bushings between metal components
- For extremely heavy headboards, consider adding secondary support legs that contact the floor
Expert Tip: When dealing with curved headboards, create custom mounting plates from 1/4″ aluminum that match the headboard’s contour. This distributes mounting forces evenly across the entire contact surface rather than concentrating stress at attachment points.
Always conduct a 72-hour stress test by cycling the bed through all positions 50-100 times before finalizing the installation. This reveals any potential weaknesses in your mounting solution.
Maintenance and Long-Term Care for Headboard Attachments
Proper ongoing maintenance ensures your headboard remains securely attached through years of adjustable bed use. These professional-grade care techniques address both visible and hidden wear factors.
Quarterly Inspection Protocol
Follow this comprehensive 5-point checklist every 3 months:
- Torque verification: Use a digital torque wrench to confirm all bolts maintain proper tightness (typically 12-15 ft-lbs)
- Bracket alignment check: Measure gap consistency between headboard and frame at multiple articulation positions
- Material fatigue inspection: Examine mounting points for hairline cracks in wood or stress marks in metal
- Hardware corrosion assessment: Look for rust formation, especially in humid environments
- Vibration test: Run the bed through all positions while observing for new noises or movement
Specialized Maintenance for Different Materials
Tailor your approach based on headboard construction:
- Upholstered headboards: Check fabric tension monthly – sagging can indicate loosened internal framing
- Solid wood: Apply furniture wax to mounting areas seasonally to prevent moisture-related expansion/contraction
- Metal frames: Apply dry lubricant (like Teflon spray) to bracket joints annually
Advanced Troubleshooting Solutions
When issues arise, these professional techniques often resolve them:
| Problem | Diagnosis | Professional Solution |
|---|---|---|
| Intermittent creaking | Metal-on-metal friction at bracket joints | Apply nylon-impregnated grease to contact points |
| Progressive misalignment | Frame settling or floor unevenness | Install self-leveling shims under bed feet |
| Visible gap widening | Bracket fatigue or material compression | Replace standard washers with Belleville spring washers |
Safety Consideration: Never attempt to reinforce attachments while the bed is in an elevated position. Always return to flat position and disconnect power before performing maintenance. For heavy headboards (>100 lbs), consider professional biannual inspections.
Implementing these maintenance practices can extend your headboard attachment system’s lifespan by 3-5 years while ensuring safe operation throughout your adjustable bed’s full range of motion.
Safety Considerations and Future Trends in Headboard Attachment Technology
As adjustable bed technology evolves, so do the safety standards and installation methods for headboard attachments. Understanding these developments ensures your setup remains both secure and future-proof.
Critical Safety Standards and Load Calculations
Modern headboard attachments must meet these key safety protocols:
| Standard | Requirement | Testing Method |
|---|---|---|
| ASTM F2057 | Withstand 4x expected load during articulation | 5000 cycle endurance test |
| UL 962 | Electrical isolation for motorized frames | 3000V dielectric withstand test |
| CPSC 16 CFR 1633 | Flame resistance for upholstered components | 30-minute open flame exposure |
Emerging Technologies in Headboard Mounting
The industry is moving toward these innovative solutions:
- Smart mounting systems: IoT-enabled brackets with strain gauges that alert users to loosening via smartphone
- Self-adjusting mechanisms: Hydraulic brackets that automatically compensate for frame movement
- Eco-friendly materials: Recycled aluminum composites with vibration-dampening properties
Cost-Benefit Analysis of Professional Installation
Consider these factors when deciding between DIY and professional installation:
- Labor costs ($150-$300) vs. potential warranty voidance from improper installation
- Time investment (4-6 hours for complex setups) vs. professional efficiency (1-2 hours)
- Specialized tool requirements ($75-$200 value) that may not be needed again
Environmental Note: Modern mounting systems now use 30-40% recycled metals and require no chemical adhesives. Look for GREENGUARD Gold certified components if indoor air quality is a concern.
Future designs are trending toward universal quick-release mechanisms that maintain structural integrity while allowing easy headboard changes. These systems use patented interlocking geometries rather than traditional bolted connections for improved safety and convenience.
Always verify that any mounting solution complies with current ANSI/BIFMA X5.9 standards for adjustable bed furniture, particularly if installing in commercial settings or healthcare facilities where usage intensity is higher.
Optimizing Headboard Stability for Different Adjustable Bed Configurations
The relationship between headboard attachment methods and specific adjustable bed setups requires careful engineering considerations. Different frame types demand tailored solutions for optimal performance and longevity.
Specialized Solutions by Bed Frame Type
Each adjustable frame design presents unique mounting challenges:
- Split-king systems: Require dual independent mounting points with flexible couplers to accommodate asymmetric movement (minimum 2″ of lateral play)
- Wall-hugger models: Need extended reach brackets (8-12″ projection) to maintain headboard position during forward slide
- Zero-clearance frames: Demand ultra-low profile attachments (under 1.5″ thickness) to prevent interference with wall proximity sensors
Advanced Vibration Dampening Techniques
Implement these professional methods to minimize operational vibrations:
- Install neoprene isolation pads between all metal-to-metal contact points (3/16″ thickness optimal)
- Use harmonic balancers on motor mounts to reduce high-frequency vibrations transmitted to headboard
- Apply constrained layer damping material to headboard back surface (1/8″ viscoelastic polymer recommended)
Integration with Smart Home Systems
Modern setups can incorporate these advanced features:
| Integration | Solution | Benefit |
|---|---|---|
| Lighting systems | Headboard-mounted control panels | Wireless switches with vibration-isolated mounting |
| Sleep trackers | Embedded sensor arrays | Shock-absorbing mounts prevent data distortion |
| Voice assistants | Recessed speaker compartments | Acoustic isolation maintains sound quality during movement |
Structural Engineering Insight: The natural frequency of your headboard assembly should be at least 50% higher than the bed frame’s operational vibration frequency (typically 3-8Hz) to prevent resonant amplification. This can be achieved through strategic mass distribution and stiffness optimization.
For medical-grade adjustable beds used in healthcare settings, all headboard attachments must comply with IEC 60601-1 electrical safety standards and feature antimicrobial coatings on contact surfaces.
Professional-Grade Validation and Performance Optimization Strategies
Ensuring long-term reliability of headboard attachments requires systematic quality assurance protocols and performance benchmarking. These advanced techniques are derived from furniture engineering standards and clinical sleep system requirements.
Comprehensive Performance Validation Protocol
Implement this 5-phase testing regimen for commercial-grade installations:
| Test Phase | Parameters | Acceptance Criteria |
|---|---|---|
| Static Load | 200% max expected weight for 24 hours | <0.5mm permanent deformation |
| Dynamic Cycling | 10,000 full articulation cycles | No visible fastener loosening |
| Vibration Endurance | 5Hz sine wave for 72 hours | RMS acceleration <0.3g at headboard |
Advanced Risk Mitigation Framework
Address these critical failure modes with professional solutions:
- Material fatigue: Implement strain gauge monitoring during first 50 usage cycles to identify stress concentrations
- Creep deformation: Use nylon-insert locking nuts on all critical joints to prevent gradual loosening
- Resonance issues: Conduct operational deflection shape analysis to detect harmful vibration patterns
Optimization Techniques for Different Environments
Tailor your approach based on usage context:
- Residential settings: Apply automotive-grade undercoating to metal components for humidity protection
- Healthcare facilities: Install antimicrobial copper alloy contact surfaces meeting EPA registration standards
- Luxury applications: Incorporate hidden magnetic alignment systems for perfect visual gaps
Engineering Insight: The optimal mounting system maintains a safety factor of at least 2.5 for static loads and 1.8 for dynamic loads. Calculate this by dividing the component’s yield strength by expected operational stresses, accounting for stress concentrations at mounting points.
For mission-critical installations, conduct biannual torque verification using ultrasonic bolt tension measurement for absolute precision. This aerospace-derived technique detects fastener fatigue before visible symptoms appear, preventing catastrophic failures in high-use environments.
Conclusion
Successfully attaching a headboard to an adjustable bed frame requires understanding compatibility factors, selecting the right mounting hardware, and following precise installation techniques.
Throughout this guide, we’ve explored specialized brackets like the Sleep Revolution SR-HB01, detailed step-by-step installation processes, and advanced solutions for challenging configurations. We’ve covered essential maintenance protocols, safety standards, and emerging technologies in headboard attachment systems.
Remember: The key to long-term stability lies in proper initial installation combined with regular maintenance checks. Whether you’re working with a standard setup or a custom configuration, the principles of weight distribution, vibration management, and material compatibility remain paramount.
For optimal results, consider professional installation for complex systems or high-value headboards. With these insights, you’re now equipped to create a secure, functional, and aesthetically pleasing connection between your headboard and adjustable bed that will withstand years of use.
Frequently Asked Questions About Attaching Headboards to Adjustable Bed Frames
Can any headboard work with an adjustable bed frame?
While most headboards can be adapted, compatibility depends on mounting style and weight capacity. Adjustable frames require headboards with either vertical mounting slots or universal bracket compatibility. Heavy headboards (>75 lbs) need reinforced steel brackets like those in the Leggett & Platt Prodigy kit.
Measure your frame’s attachment points (typically 16-24″ apart) before purchasing. Upholstered headboards often work best as they’re lighter and more flexible during bed articulation.
What’s the most secure mounting method for heavy headboards?
For headboards over 100 lbs, use a three-point mounting system with aircraft-grade aluminum brackets. The center bracket should be positioned 12″ above the mattress line to distribute weight evenly.
Professional installers recommend 3/8″ lag bolts with nylon-insert locking nuts, plus rubber vibration pads between all contact surfaces. Always test with the bed in all positions before final tightening to ensure no stress points develop.
Why does my headboard creak when the bed adjusts?
Creaking typically indicates metal-on-metal friction or loose components. First check all bolt tightness (12-15 ft-lbs torque). Apply dry lubricant (like Teflon spray) to bracket joints.
If persisting, install neoprene washers between mounting plates. For wooden headboards, check for seasonal expansion gaps – a thin layer of furniture wax on contact points often solves this. Persistent noise may require upgrading to vibration-dampening brackets.
How do I attach a headboard to a split king adjustable bed?
Split kings require special consideration since each side moves independently. Use a dual-mount system with flexible couplers that allow 2-3″ of lateral movement.
The Zinus Universal Kit works well when installed with a center support bridge. Ensure headboard mounting points align perfectly with both frame sections when flat – laser alignment tools help achieve this precision. Test each side’s full range of motion separately after installation.
What’s the cost difference between DIY and professional installation?
DIY costs range $50-$150 for quality brackets and tools. Professional installation averages $200-$400 but includes warranty protection and precision alignment.
Consider professional help if: your headboard is antique/valuable (>$1000), weighs over 150 lbs, or requires custom fabrication. Many mattress stores offer discounted installation when purchasing the adjustable base.
Can I use my existing traditional bed frame brackets?
Standard brackets often fail because they don’t accommodate bed movement. Adjustable frames need brackets with: extended reach (minimum 6″), vibration-resistant hardware, and flexible joints.
The Sleep Revolution SR-HB01 converts traditional brackets by adding articulation points and reinforced gussets. Always verify weight ratings – adjustable bed brackets typically support 50% more weight than standard versions.
How often should I check the headboard attachments?
Perform quarterly inspections: check bolt torque, bracket alignment, and material stress points. After the first month, re-tighten all hardware as new installations typically settle. In high-humidity areas, inspect for rust every 2 months.
For heavy daily use (like medical facilities), monthly checks are recommended. Keep a maintenance log noting any gap changes or new noises during adjustment cycles.
What safety certifications should I look for in mounting hardware?
Prioritize products with ASTM F2057 (furniture safety) and UL 962 (electrical component) certifications. Healthcare applications require IEC 60601-1 compliance.
Look for brackets made from 12-gauge steel (minimum) with zinc-plated or powder-coated finishes. Avoid hardware without specified load ratings – quality kits clearly state both static (≥300 lbs) and dynamic (≥150 lbs) weight capacities.