Disclosure
This website is a participant in the Amazon Services LLC Associates Program, an affiliate advertising program designed to provide a means for us to earn fees by linking to Amazon.com and affiliated sites.
Setting up your adjustable bed remote might seem like a chore, but it’s the key to unlocking all its comfort features. Skipping steps can leave you frustrated and missing out on the perfect position.
In my experience, these directions are more than just button mapping. They often include crucial steps like pairing the remote to the base or setting safety lockouts, which protect both you and the motor system.
Ever Feel Like Your Adjustable Bed Remote Is Speaking a Different Language?
We’ve all been there. You just want to relax, but the remote won’t pair, or a button stops working. Skipping the setup feels faster, but it often leads to this exact headache. This replacement remote is pre-programmed and ready to go, eliminating the confusing setup process entirely.
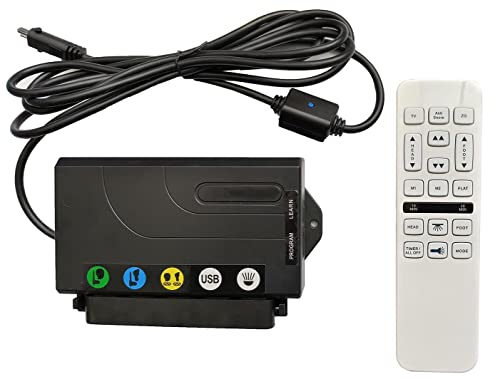
To finally get a remote that just works, I got the: Flex Fit Replacement Remotes Linak Premier Wireless Remote

- This is the OEM replacement for the Linak Premier Remote Replacement (New...
Why Following Your Adjustable Bed Remote Instructions is So Important
I get it. You just want to relax. But trust me, taking a few minutes now saves a lot of headache later. It’s about more than just comfort.
It’s about safety and making sure your investment works right from day one. Let me tell you why this step really matters to your daily life.
Safety Features Depend on Proper Set-Up
Your remote controls more than just up and down. It manages important safety functions. These features only work if you program them correctly during set-up.
For example, many beds have a “flat” button or a “zero-gravity” preset. If these aren’t set right, the bed might not return to a safe, flat position. This is crucial if you ever feel dizzy or need to get up quickly.
I once helped a friend whose bed kept stopping in an awkward, tilted position. We realized the safety limits were never programmed. It was a simple fix in the manual we had skipped.
Avoiding Frustration and Wasted Time
Think about the last time a gadget didn’t work as promised. It’s incredibly annoying, right? The same goes for your adjustable bed frame.
If the remote isn’t paired correctly, you might experience:
- Buttons that don’t respond when you press them.
- The head and foot sections moving out of sync.
- Losing all your programmed favorite positions overnight.
This turns your relaxing oasis into a source of nightly frustration. Following the directions carefully from the start prevents all of that.
Protecting Your Investment in a Quality Bed
These beds are not cheap. The motors and electronics are built to last, but they need to be treated right. Incorrect set-up can actually strain the system.
Imagine constantly trying to move the bed past its intended limit because a stop point wasn’t set. That puts unnecessary wear on the motor. It’s like driving your car with the parking brake on.
Taking time with the remote instructions helps ensure your bed provides comfort for years. It’s a small step that protects the big purchase you made for your health and sleep.
How to Set Up Your Adjustable Bed Remote the Right Way
Let’s make this easy. I’ve set up a few of these beds for family, and there’s a simple method. The goal is to get it working perfectly on the first try.
Grab your remote, the manual, and maybe a cup of coffee. We’ll go step-by-step. You’ll be relaxing in your perfect position before you know it.
Gather Your Tools and Read First
This sounds obvious, but it’s the step everyone skips. Don’t just glance at the pictures. Actually read the first page or two of the manual.
Look for a quick start guide. Have your bed’s model number ready. Also, make sure you have fresh batteries for the remote. An old battery can cause pairing issues.
The Key Step: Remote and Base Pairing
This is the most important part. Your remote and the bed’s motor need to “talk” to each other. This is called pairing or syncing.
The manual will have a specific sequence. It usually involves holding down two buttons on the remote near the base. A light will flash or beep to confirm.
Do not rush this. If it fails, start over. A good pairing means reliable control every single time you press a button.
Programming Your Favorite Positions
Now for the fun part! Once paired, you can save your favorite lounging spots. Common presets include Zero-Gravity, TV Watch, and Anti-Snore.
To set one, move the bed to your perfect spot. Then hold the preset button (like “M1” or “Mem”) for a few seconds until it beeps. The bed will remember that exact angle.
I recommend setting at least two:
- One for watching movies or reading.
- One that’s perfectly flat for getting in and out of bed safely.
Feeling overwhelmed by confusing buttons and worried you’ll never get your bed to work right? What finally worked for me was using a remote with super clear labels that my whole family could understand.
- Adjustable bed HJH55 remote control + HJC18 receiver control box by RichmatUp to...
- The advantage of buying the remote control and receiver box together is that you...
- Only for adjustable beds with RICHMAT logo motors, head and foot lift, vibration...
What I Look for When Buying an Adjustable Bed Frame
If you’re shopping, it’s easy to get lost in features. Based on my experience, here’s what actually matters for daily use and long-term happiness.
Easy-to-Understand Remote Control
The remote is your main point of contact every single day. I look for one with clear, intuitive buttons. I avoid remotes covered in tiny, confusing symbols.
My mom needs to use hers without her glasses. Big, backlit buttons with simple words like “Head Up” or “Flat” are a must for us.
Quiet Motor Operation
You don’t want a loud, grinding noise every time you adjust your position. A quiet motor means you can move without waking your partner.
I test this by listening to video reviews. A gentle hum is fine, but any loud clunking or whining is a dealbreaker for a bedroom.
Strong Weight Capacity and Warranty
Always check the weight limit. Add your weight, your partner’s, and the mattress. Then add a safety margin. This protects the motors.
A good warranty, like 5+ years on the frame and motors, shows the company trusts its product. It gives me peace of mind for my investment.
Compatibility With Your Mattress
Not all mattresses work on an adjustable base. You typically need a flexible one, like memory foam or latex. Traditional innerspring mattresses often won’t bend.
I always double-check with the mattress manufacturer first. Using the wrong type can void warranties and ruin your mattress over time.
The Mistake I See People Make With Bed Remote Set-Up
The biggest mistake is assuming all remotes work the same. People toss the manual and just start pressing buttons. This almost always leads to a problem.
They might get the bed to move, but the preset memory buttons won’t work. Or the safety features remain disabled. The bed functions, but not correctly or safely.
The fix is simple. Treat the first use as a dedicated set-up session. Don’t try to do it while you’re tired and just want to sleep. Follow each step in order, even the ones that seem unnecessary.
Tired of fumbling with a complicated remote in the dark? What I grabbed for my kids’ room was a simple remote with a flashlight built right in.

- This is a replacement remote compatible with the Tempur-Pedic Ease...
- We provide pairing instructions. We can order remotes for other bases but you...
How a Quick Set-Up Saves You Time Every Night
Here’s my favorite tip. Taking twenty minutes to set up your remote properly saves you seconds every single night. Those seconds add up to real convenience.
Think about it. When your “TV Watch” button takes you to the perfect spot instantly, you’re not fiddling. You’re relaxing. When the “Flat” button works reliably, you get in and out of bed safely without a second thought.
This small upfront effort eliminates nightly frustration. Your bed becomes a tool that works for you, not a gadget you struggle with. It transforms your routine from a chore into a seamless part of your wind-down.
I set up my parents’ bed this way. Now my dad can adjust his side without asking for help or squinting at tiny buttons. That independence and ease is the real benefit of doing it right the first time.
My Top Picks for a Reliable Adjustable Bed Remote
If you need a replacement remote, I’ve had good experiences with these two. They both make set-up straightforward, which is the whole point.
Reverie Adjustable Bed Replacement Remote for 5i, 5D, 7S — The Direct OEM Replacement
The Reverie remote is the official replacement for many of their beds. I like that it pairs instantly because it’s made for the system. It’s the perfect fit if you want guaranteed compatibility with your existing Reverie base. The trade-off is it’s specifically for those models, so check your bed number first.

- This is an exact OEM replacement remote for the Reverie 5i, 5D, 7S, R400, or 4M...
Karmelly 6-Button 5-Pin Wireless Remote Control — A Simple, Universal Option
The Karmelly remote is a great universal choice. I appreciate its simple six-button layout, which is less confusing than remotes covered in tiny icons. It’s perfect for someone who just needs basic up/down control for head and foot. The honest trade-off is you may need to check the pin connector to ensure it fits your motor.

- WIRELESS CONTROL: Advanced wireless remote handset with 6 buttons for seamless...
- EASY OPERATION: Simple up/down controls for head and foot sections, plus...
- COMPATIBILITY: COMPATIBILITY: The 5-pin connector is designed to be compatible...
Conclusion
Following your adjustable bed remote directions carefully is a small task that guarantees safety, comfort, and long-term reliability.
Go find your remote and manual right now—spend five minutes checking that your favorite positions and safety limits are programmed correctly. You’ll sleep easier knowing it’s set up right.
Frequently Asked Questions about Do I Have to Follow the Adjustable Bed Remote Set-Up Directions Carefully?
What happens if I don’t follow the set-up directions?
You might get partial function, but miss key features. The bed could move, but your preset memory buttons might not save your favorite positions. Safety features like programmed stop limits could also be disabled.
This leads to nightly frustration and can even strain the motors over time. Taking a few minutes to set it up correctly ensures everything works as designed from the very first night.
Can I use a universal remote instead of the one that came with my bed?
Sometimes, but compatibility is crucial. A universal remote must match the connector type and communication protocol of your specific bed base. Using the wrong one can damage the control box.
If you’ve lost your original remote, I recommend looking for a direct replacement from the manufacturer first. For a reliable universal option, the one I sent my sister to buy has worked well for basic functions on many beds.
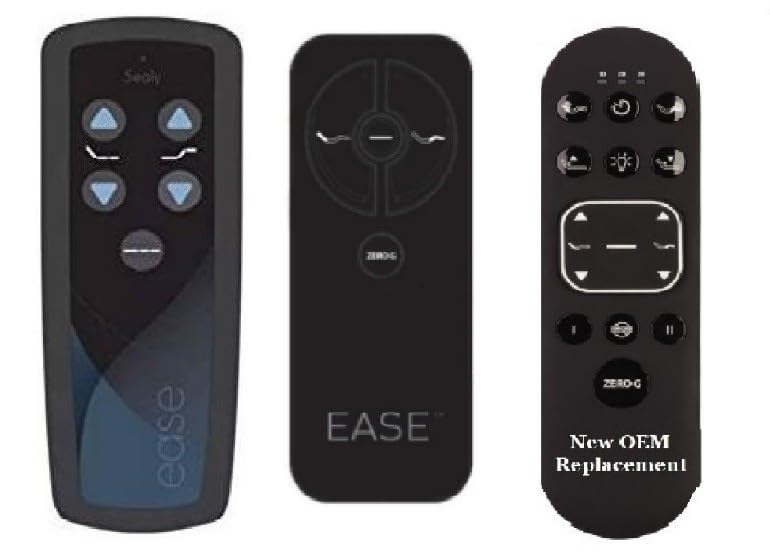
- This is replacement remote compatible with the Tempur-Pedic and Sealy Ease...
- We can order remotes for other Tempurpedic and Sealy models but you must view...
- All functionality remains the same just in a simplified layout... and you gain a...
Why won’t my remote pair with the bed after I tried setting it up?
This is common and usually has a simple fix. First, check that you’re using brand new batteries. Weak power is the top cause of pairing failure. Also, ensure you’re following the exact button-hold sequence from the manual.
Make sure you’re close to the bed’s control box during pairing. If it still fails, try unplugging the bed base from the wall for a full minute to reset the system, then try the pairing steps again.
What is the best replacement remote for someone who needs simple, large buttons?
If you or a family member struggles with small, complicated controls, a simple remote is essential. You need one with clear, backlit buttons and minimal clutter for easy nighttime use.
For that specific need, what finally worked for my dad was a remote with just six large, well-labeled buttons. It eliminated his confusion and made the bed easy and safe for him to operate independently.
No products found.
Do I need to re-pair my remote if I change the batteries?
Usually, no. Most remotes retain their memory and pairing through a battery change. The key is to change the batteries quickly, within a minute or two, to prevent the remote’s memory from clearing.
If you do lose the pairing after a change, just follow the original set-up directions again. It’s the same simple process you did the first time to sync the remote to the base.
How do I program the anti-snore or zero-gravity preset on my remote?
First, use the manual buttons to find the position that feels best for you. Once you’re comfortable, press and hold the corresponding preset button (like “Zero-G” or “M1”) until you hear a beep or see a light flash.
This tells the bed’s brain to memorize that exact angle. Test it by pressing the “Flat” button, then your new preset. The bed should automatically return to your saved spot.